Installing and Configuring CentOS 7 on Virtualbox
Unix based operating systems are ruling the web server OS market. According to the report created by W3techs, Unix is used by 66.5% of all the websites; whereas 33.5% websites are using Windows OS.

Unix is clearly leading. Let’s break it down into the actual OS, because there are many operating systems based on Unix are available in the market. According to the report concluded by SolveDNS, CentOS, Redhat, Ubuntu, and Debian are the top, and Fedora follows them.

The CentOS clearly stands out amongst the others; it has its advantages and disadvantages. However, it has been clearly adopted by a large number of community members; it must have some weighted over others. Moreover, in this article, we will discuss the core architecture, how it is different from others, and how to install and configure it on the VirtualBox (demonstration).
The CentOS Linux distribution is a stable, predictable, manageable and reproducible platform derived from the sources of Red Hat Enterprise Linux (RHEL). Since March 2004, CentOS Linux has been a community-supported distribution derived from sources freely provided to the public by Red Hat. As such, CentOS Linux aims to be functionally compatible with RHEL. We mainly change packages to remove upstream vendor branding and artwork. CentOS Linux is no-cost and free to redistribute.
The CentOS Project is a community-driven free software effort focused around the goal of providing a rich base platform for open source communities to build upon. We will provide a development framework for cloud providers, the hosting community, and scientific data processing, as a few examples. We work with several ‘upstream’ communities to help them layer and distribute their software more effectively on a platform they can rely on. – CentOS Linux
There is not a direct relationship between the CentOS and Red Hat Linux; CentOS is the repackaged version of the Red Hat Enterprise Linux; unlike the Red Hat Linux, it is free. The CentOS is a free clone of the Red Hat Linux without the active and direct support from the CentOS team.
How to Install the CentOS on Virtualbox:
The things that you will need:
Download the appropriate version of both the packages, the 64-bit architecture has been used for this demonstration, download the software accordingly.
Step 1:
Install the virtual box and open it. Click on the new to setup the new VM, select the Linux and then Red Hat, since CentOS is the clone of Red Hat and it uses the similar architecture.

In the next window, allocate the memory size. Allocate at least 1024MB; you can allocate more if you have enough memory. Create the virtual disk (VDI) and move to the next screen. Fixed size of the disk is not recommended in any scenario because you will be downloading many packages to run various applications. Select the dynamically allocated, make sure that your hard drive has enough free space. The 15GB space is sufficient enough to start with, select and then finish the setup.
Step 2:
The ISO image of the downloaded CentOS has to be linked to the newly created virtual machine, click on the setting à storage à empty àbrowse the ISO image
Enable the network adapter so that it can use the internet to download the required packages.

Start the virtual machine.
Step 3:
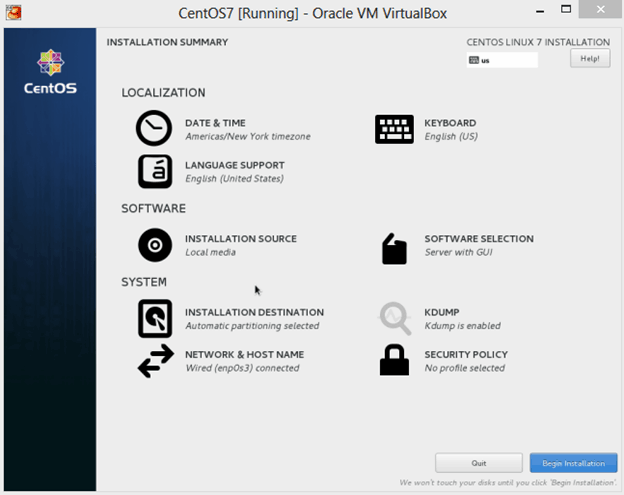
Select the option “Install CentOS Linux 7” and hit enter. It will take time to load the packages, and you will see the opening screen of the server. It requires the basic information to set up the server, for example:
- Time zone
- Keyboard layout
- Language support
- Installation source
- Software selection (Important)
- Installation destination
From the first opening screen, select the language that you would like to use during the installation process; for example, English (United States).

Once you have finished providing the basic information (Language, keyboard, date & time), click on the installation source to confirm the ISO image that we have linked in step 2. Verify the installation source, go back and click on the software selection option.
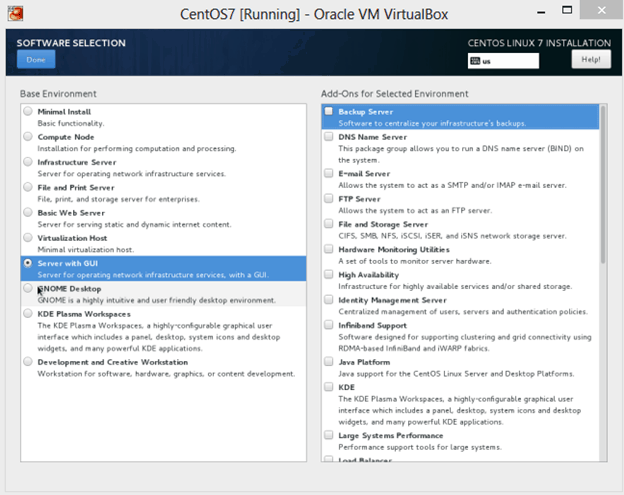
Select the desired option; for example, if you want to create an infrastructure server to run the complete network operation, select this option to get all the required packages installed. Similarly, it goes to the other option as well. Select the server with GUI to get the server installed with the graphical interface option, you can select the add-ons at this moment, or you will get it whenever you need them. Click done, it will check the software dependencies, and you will see the confirmation in a couple of seconds.
Click on the installation destination, and select the newly created disk space. In the network and hostname setting, enable the network. You are done!
Begin the installation.
In the next screen, you will be asked to set up the root and username details. Select the strong root password and create your user.
It will take time, sit back and see the installing operation.
Step 4:
After finishing the setup, you will see the login screen:

Click on not listed and then login using the root credentials, root access is required because we will be installing the repository. Click on the Application à Run terminal
On your terminal hit the following command to get the entire repository installed:
# yum install epel release

EPEL (Extra package for Enterprise Linux) is an open source and free repository; it provides 100% high-quality add-on software packages for Linux distributions including Red Hat, CentOS, and Fedora.
The CentOS 7 server is ready with the most important repository. In this article we have discussed the process to get the CentOS installed; in the later article of this series, we will be discussing the configuration of other kinds of server-side software.
