How to Install WordPress
WordPress is the most favorite platform for developing websites as it powers nearly 59% of all the websites using a CMS platform. This is typically due to its simple interface and providing the ease to use plugins for extended operability and support. Moreover, you can also use thousands of free and Paid WordPress themes to make your website look stunning in all aspects. To have a quick support from the theme’s builders.

The platform also supports well-designed themes which can be readily utilized for the website design. It provides easy drag and drop options for placing the widgets on the website. Further, you can also add customization codes and enhance the features according to your understanding and requirement.
In this post, we will be telling you about how to setup WordPress manually along with a quick Softaculous installation tutorial for installing WordPress on any Web-Hosting platform. The whole setup is being divided into six steps:
Installing the WordPress CMS on your hosted server can be done in various ways. Although, it is always advised to install it manually as it is more secure rather than going for a one-click installation. Follow the below steps to setup WordPress manually on your hosting server.
1 Download the WordPress Package
To install the WordPress CMS you will need to download the WordPress package from the below link.
Download WordPress from the official website – Click Here
2 Upload the Package to your Hosting Account
This can be down in three ways:
- Uploading via FTP (File Transfer Protocol)
- Uploading via File Manager
- Uploading SSH (Secure Socket Shell)
3 Create the MySQL Database and User
For this, you will need the cPanel access of your hosting account. WordPress typically stores all the information in a database. A database can be thought as a storage house for all the content a visitor views on your website. It stores the text files, WordPress Themes, plugins etc.
For storing the data you will need to create a database which can be done using the below procedure.
-
- Log in to your cPanel.
- There is usually a MySQL Database Wizard under the Database section. Click on it. Kindly note down the below details in a separate text file as it will be used in further steps.

-
- Create a Database and enter the database name. Click Next Step.
-
- Create Database Users and enter the username and password. Click Create User.

- Create Database Users and enter the username and password. Click Create User.
-
- Add the user to the Database. After this, you will be lead to the privileges option. Select the options according to your need. If you are creating an admin account then select all privileges. Although, if making a user account for an employee, you can restrict him by providing fewer privileges.
 Note down the details mentioned above including the database name, username and password in a separate text file and save it in a secure folder.
- Add the user to the Database. After this, you will be lead to the privileges option. Select the options according to your need. If you are creating an admin account then select all privileges. Although, if making a user account for an employee, you can restrict him by providing fewer privileges.
4 Fill the details in WordPress

In order to connect your database with WordPress, you need to fill up the details from Step 3 in WordPress too. Let us see how:
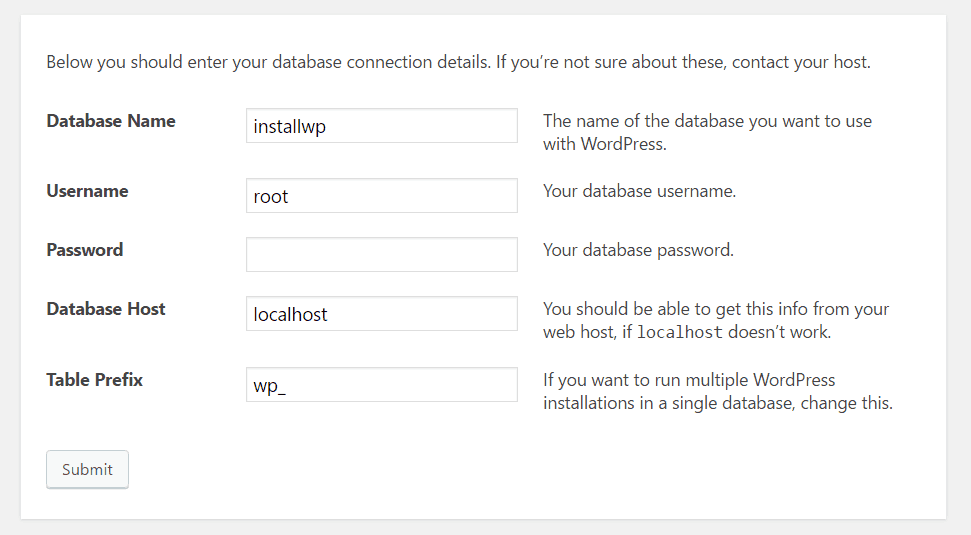
- As soon as you start WordPress on your browser, it will ask for the necessary details for connecting up the database. Enter the database name which you had created earlier.
- Enter the database username.
- Enter the database password. You should use a lengthy and difficult password for the database. For this, you can use Passwords Generator which combines characters, numbers and special character to form a strong password.
- Choose the Database Host. You can get this info from your web host.
- We would suggest you keep the table prefix different than the default “wp”. Using a different prefix will make your database more secure and will make it hard for any unauthorized person to guess it.
Submit the details in the end. This would connect the database with your WordPress account.
5 Run the WordPress Installation
You have successfully completed the primary steps and now you need to press the final button. After this step, you can set up one of the best WordPress blog themes and make your site live on the web.
The last job is to execute the installation script from the installation page. You can find the script using either of the below URLs:
http://yourdomain.com/wp-admin/install.php
http://yourdomain.com/blog/wp-admin/install.php
Replace yourdomain.com in the above link by your actual domain link. After this you will be followed by the page saying “Welcome to the famous five minute WordPress installation process!” and you are done.
Now, assuming the FTP transfer has finished, you can go to your domain name to complete the installation process. When you visit your domain, you should see the WordPress install wizard. First, you need to choose your language:

Then, make sure you have the details for your database name, user, and password handy. Enter them when prompted:
If all goes well, you should be able to run the WordPress install:

Give your WordPress site a title and enter the information necessary to create your admin account:

Then click Install WordPress.
And that’s it! You just learned how to install WordPress manually. You can now log in with the account details that you entered during the install process:
