Close

PODS with ELEMENTOR PRO

Part 1 Pods Admin

Plugin installed in WordPress 5.6 (Nina) Simone

Pods – Custom Content Types and Fields

Version 2.7.25 | By Pods Framework Team

Step by step:

Here is how to connect members to location.

In the backend of WordPress

Go to Pods Admin

1 – add Members

Inside the screenshots MEMBERS are named SCIENTISTS. Keep it simple and named the field MEMBERS

Pods Admin ==> add new Create new
Member ==> Custom Post Type

In the TAB Advanced Field :

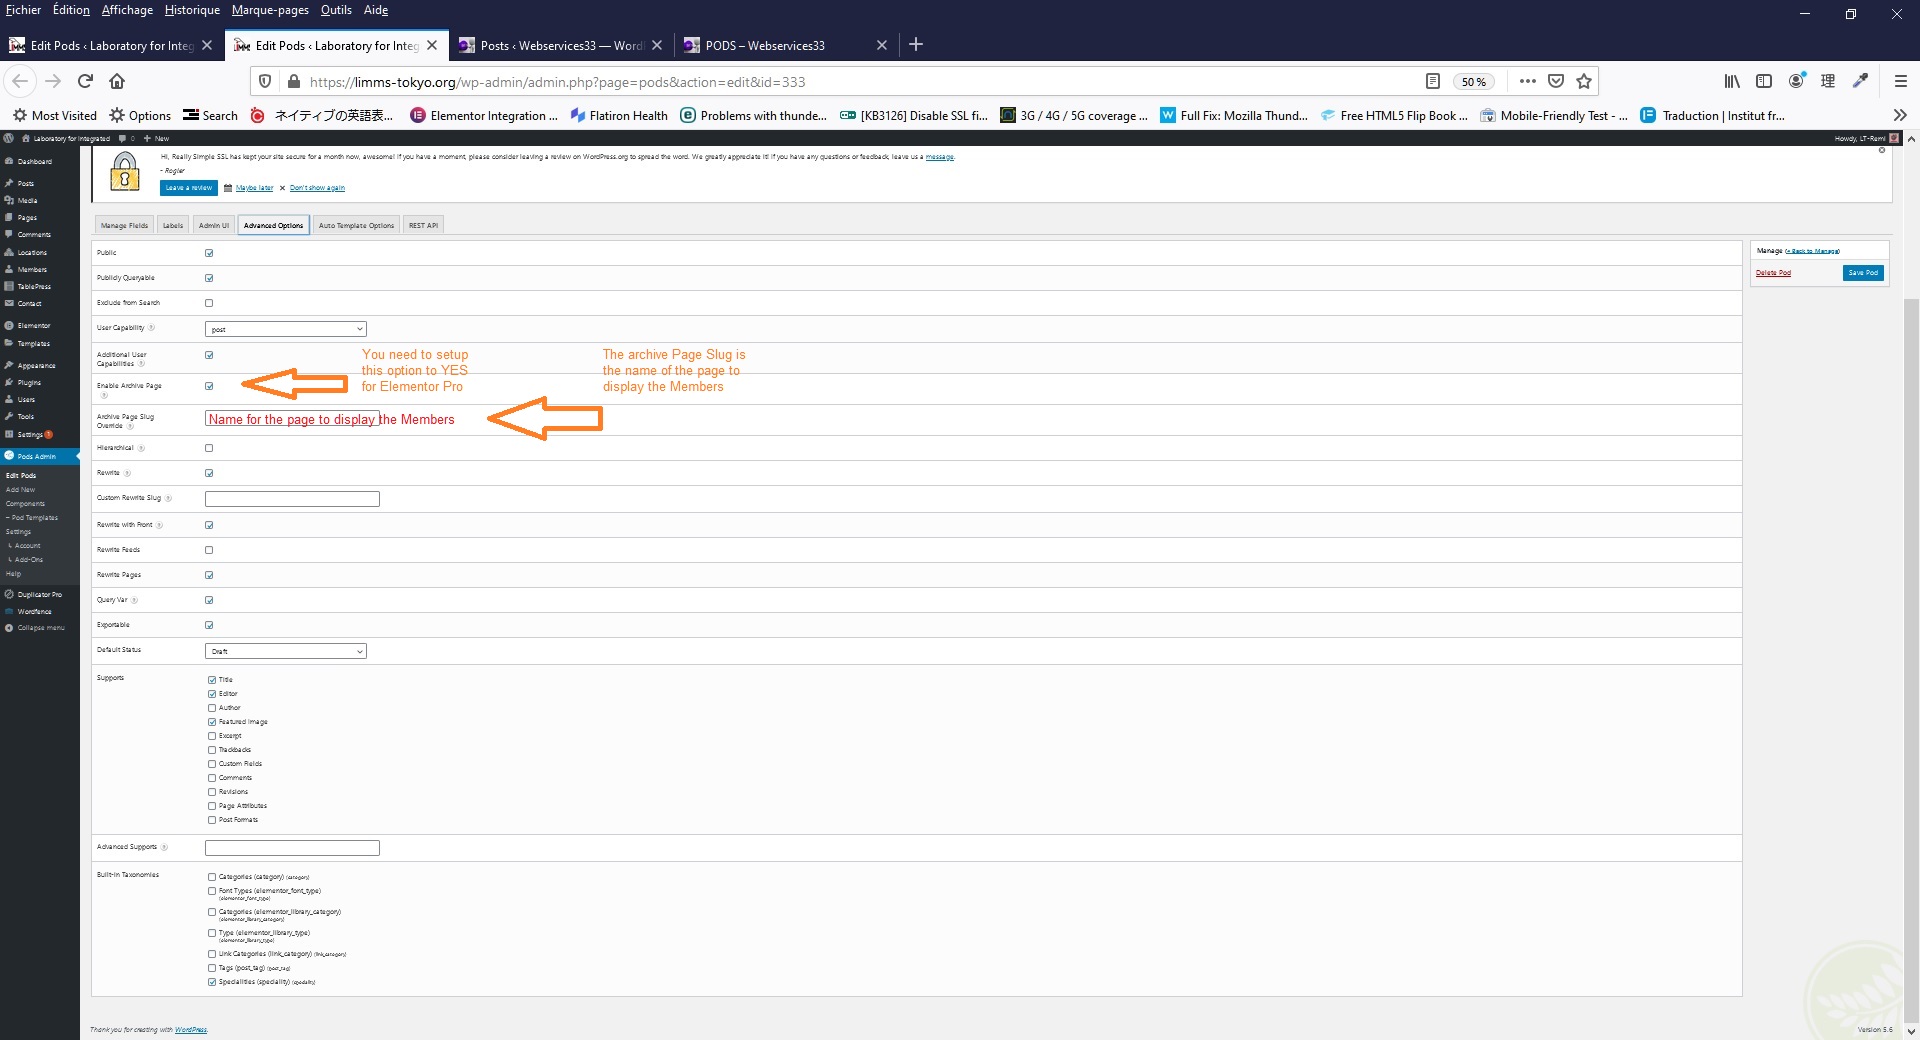
Check [ X] Enable Archive Page. If not checked Pods will not works with Elementor  Pro.

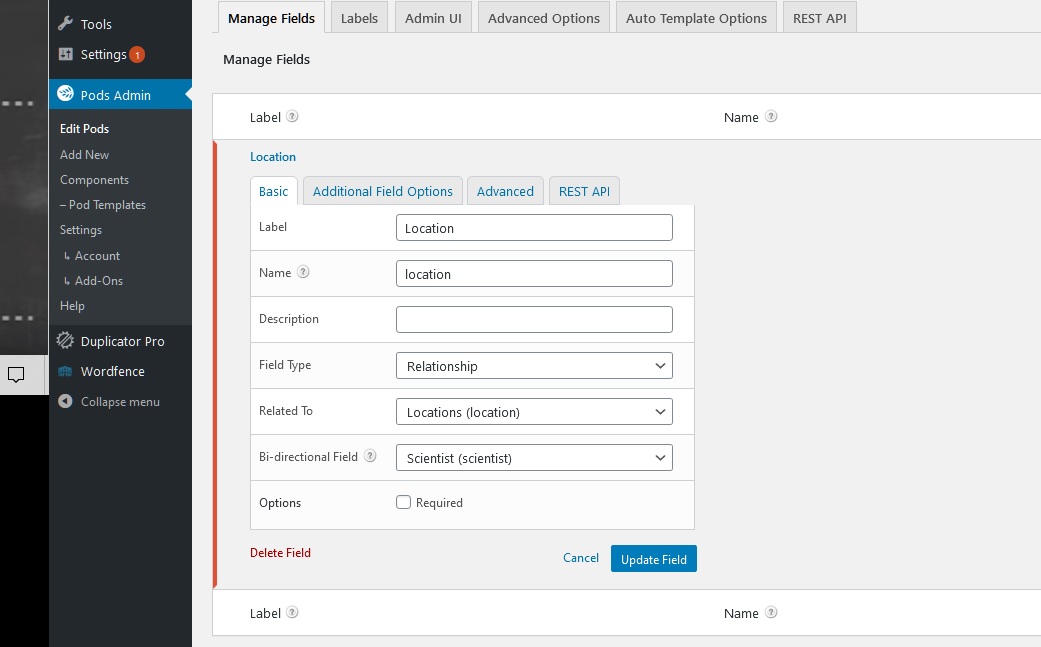
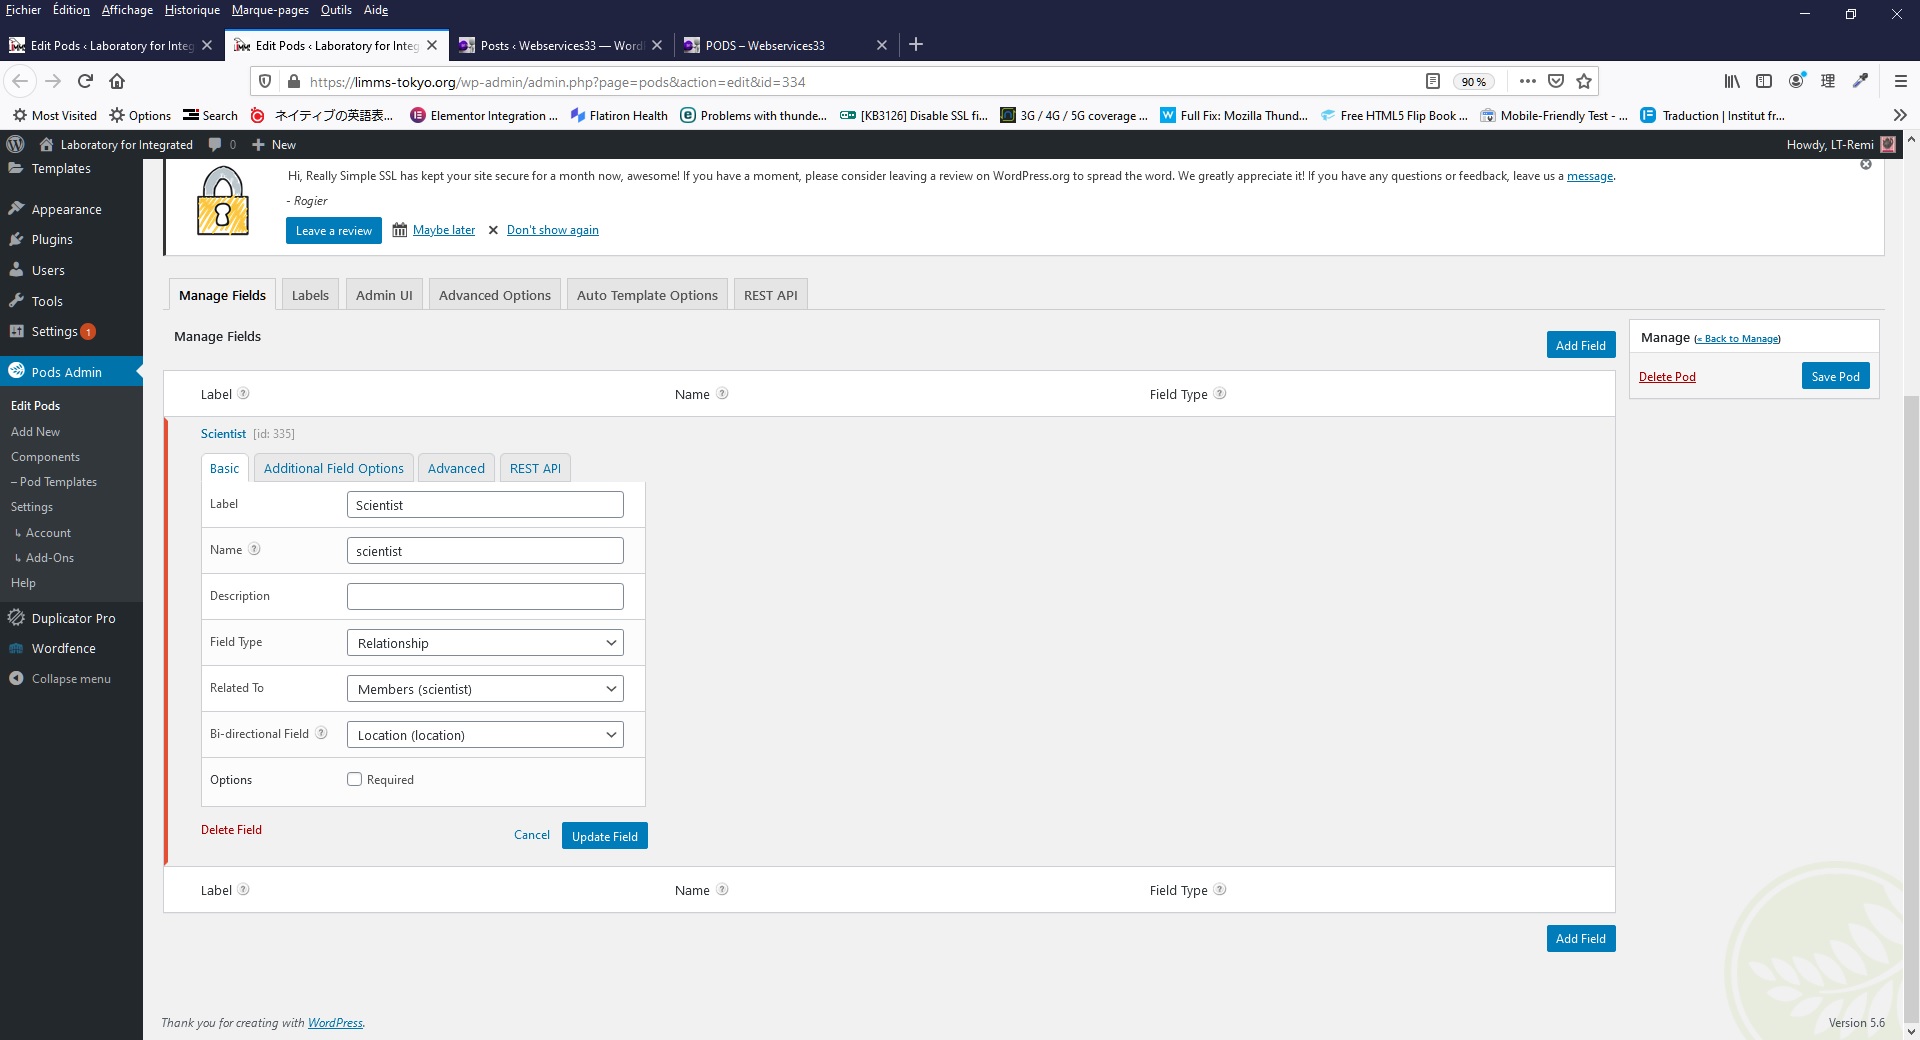
1-Members-add-Field-Location
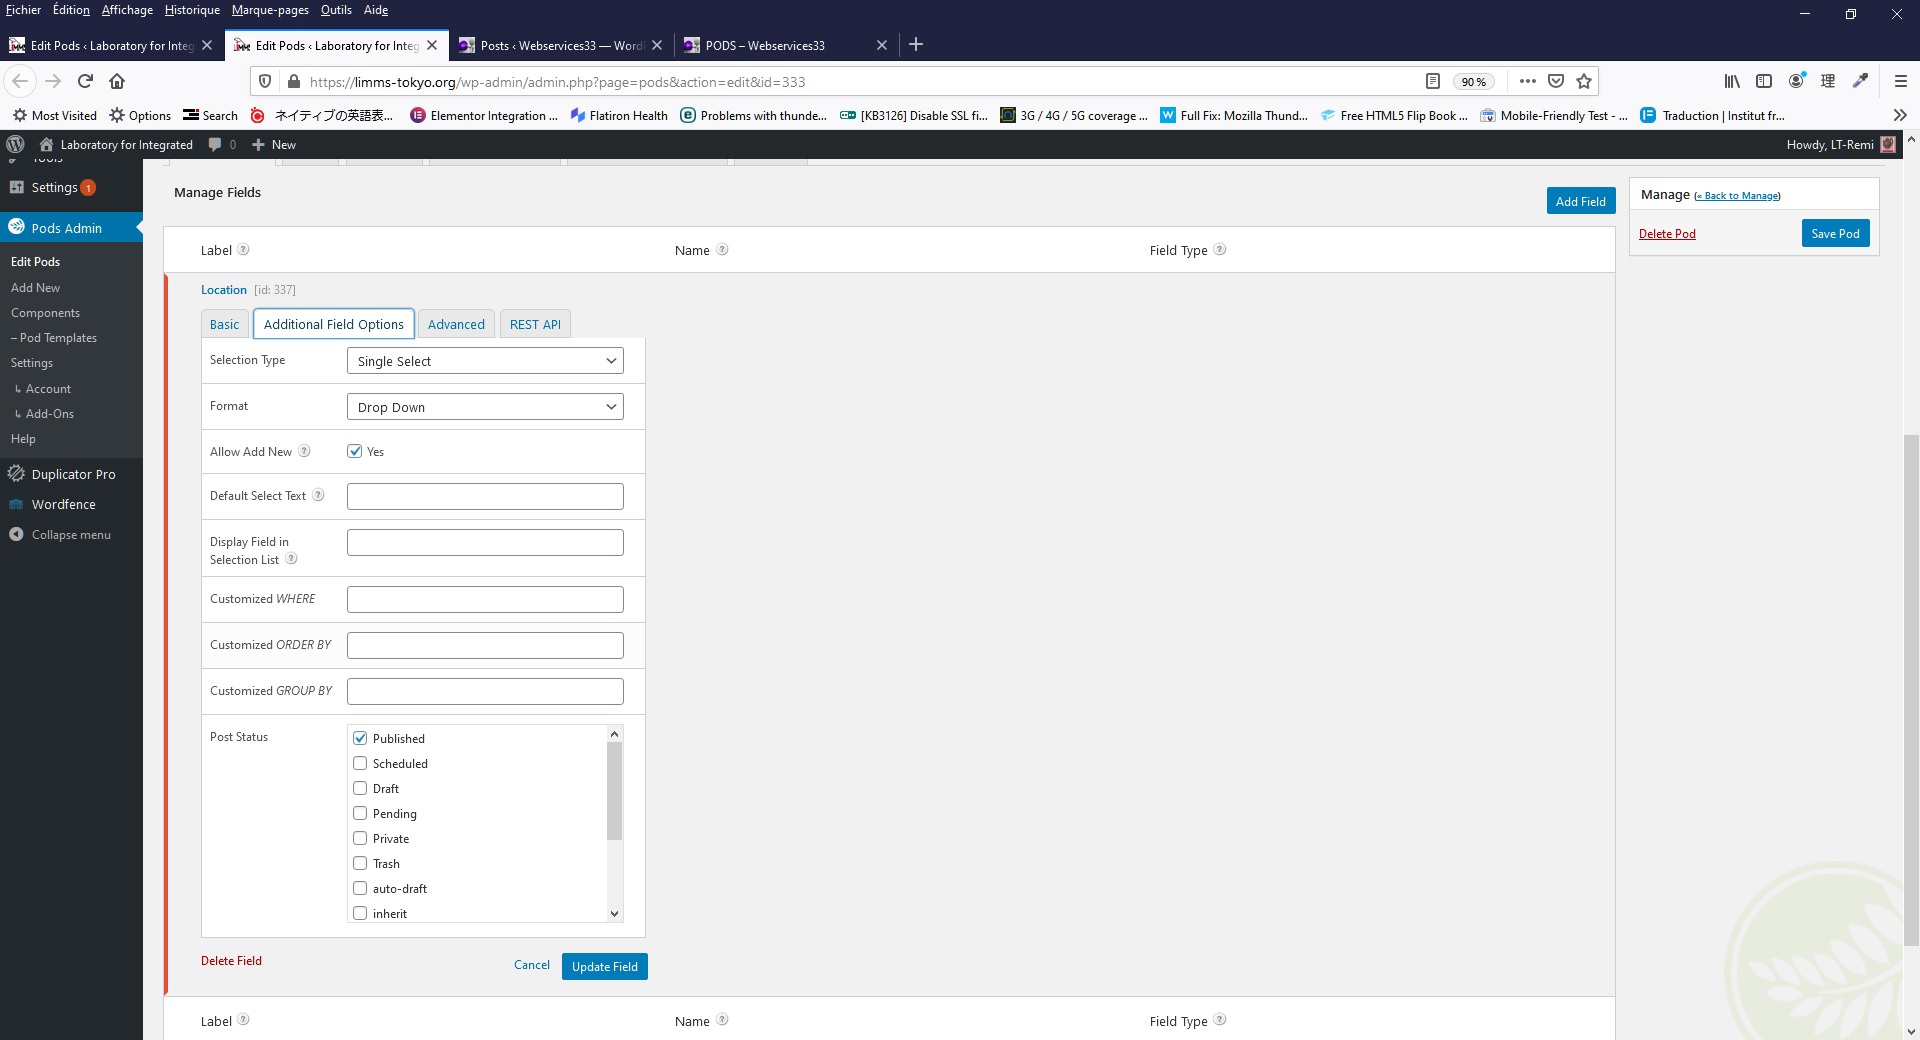
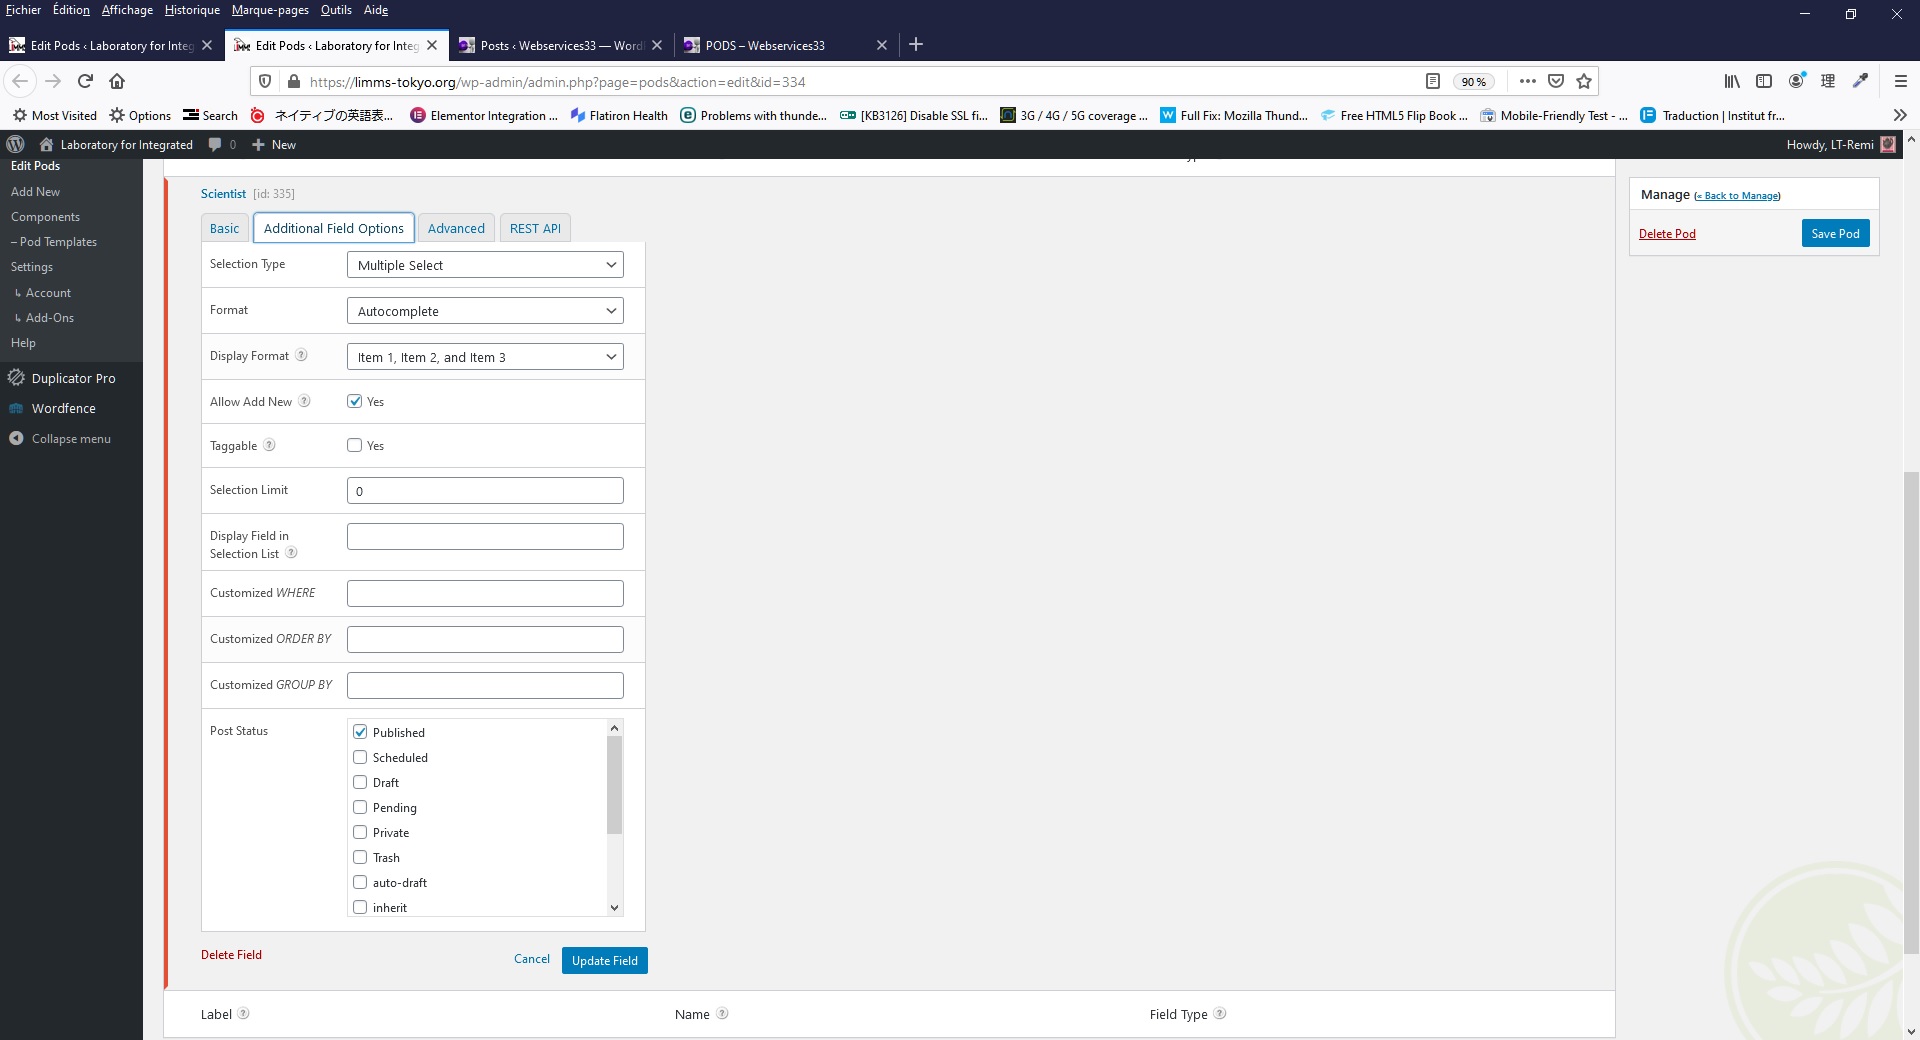
2-Members-add-Additional-Field-Options-Location
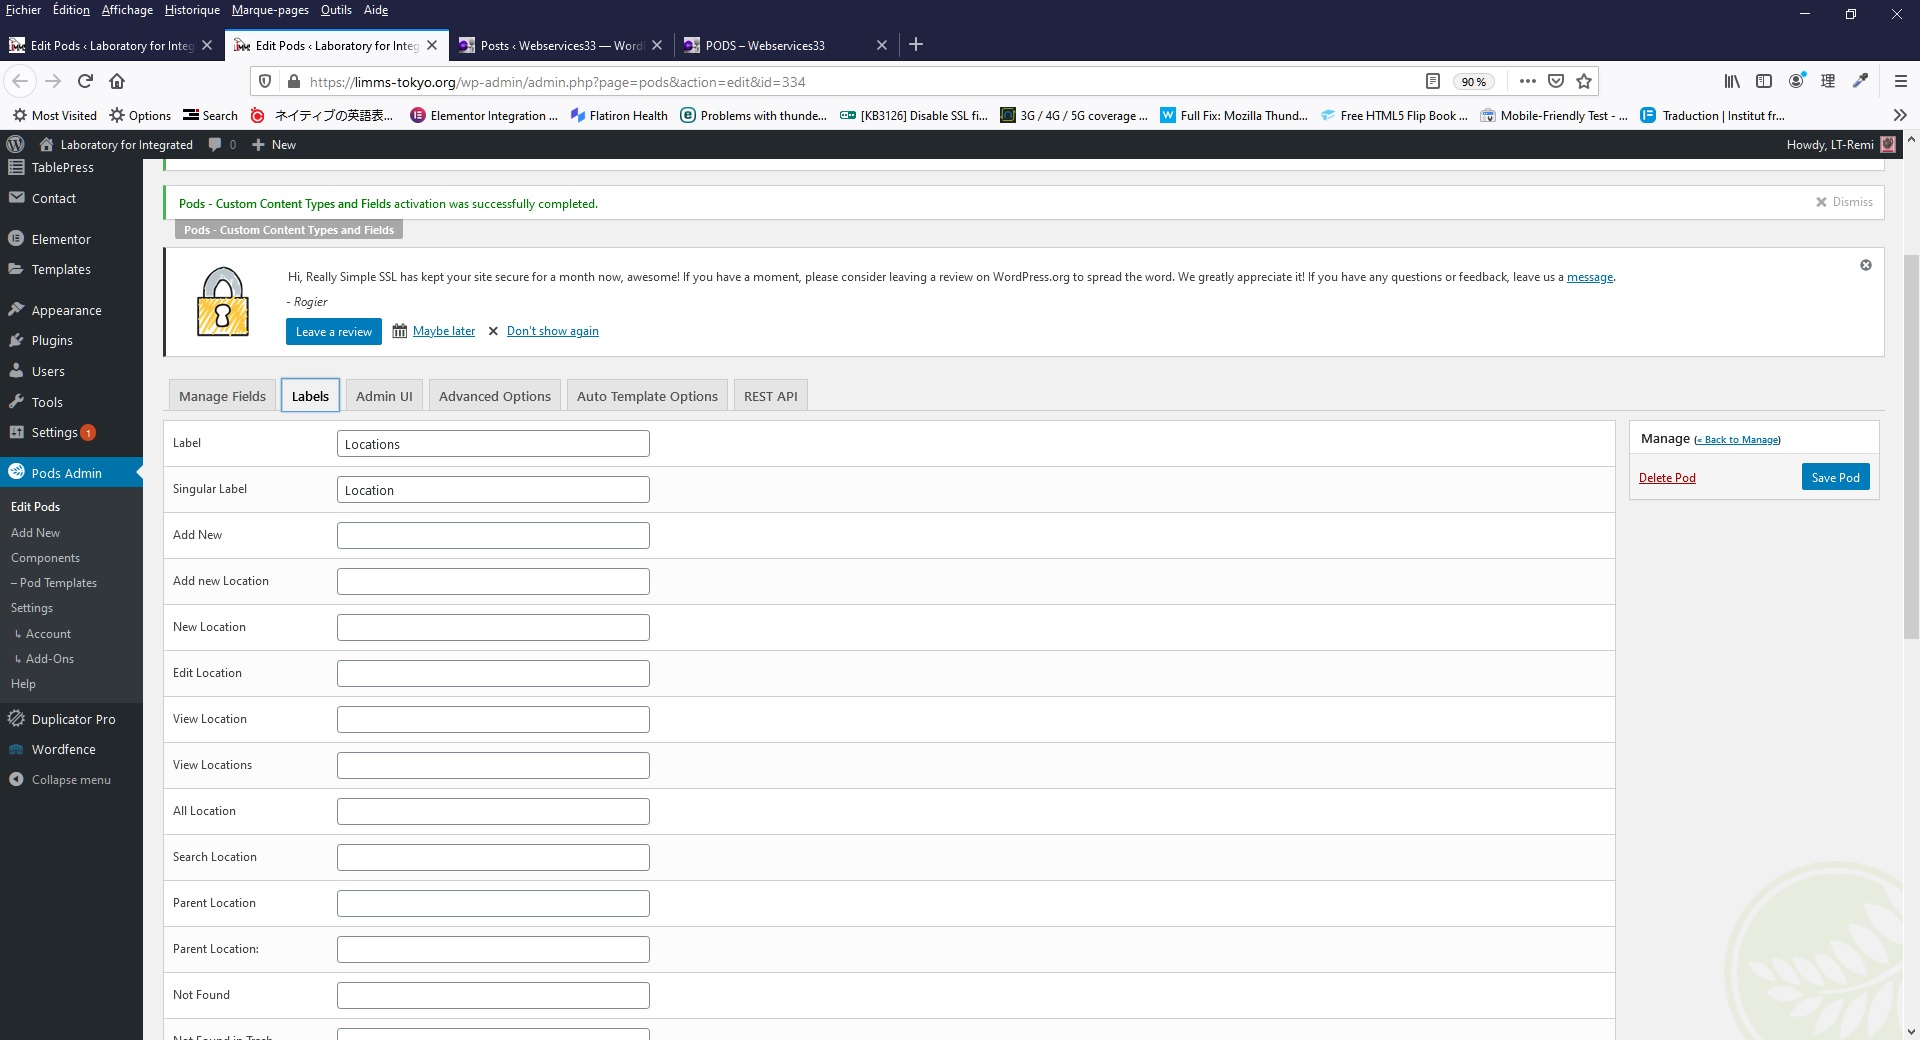
3-Members-add-Labels
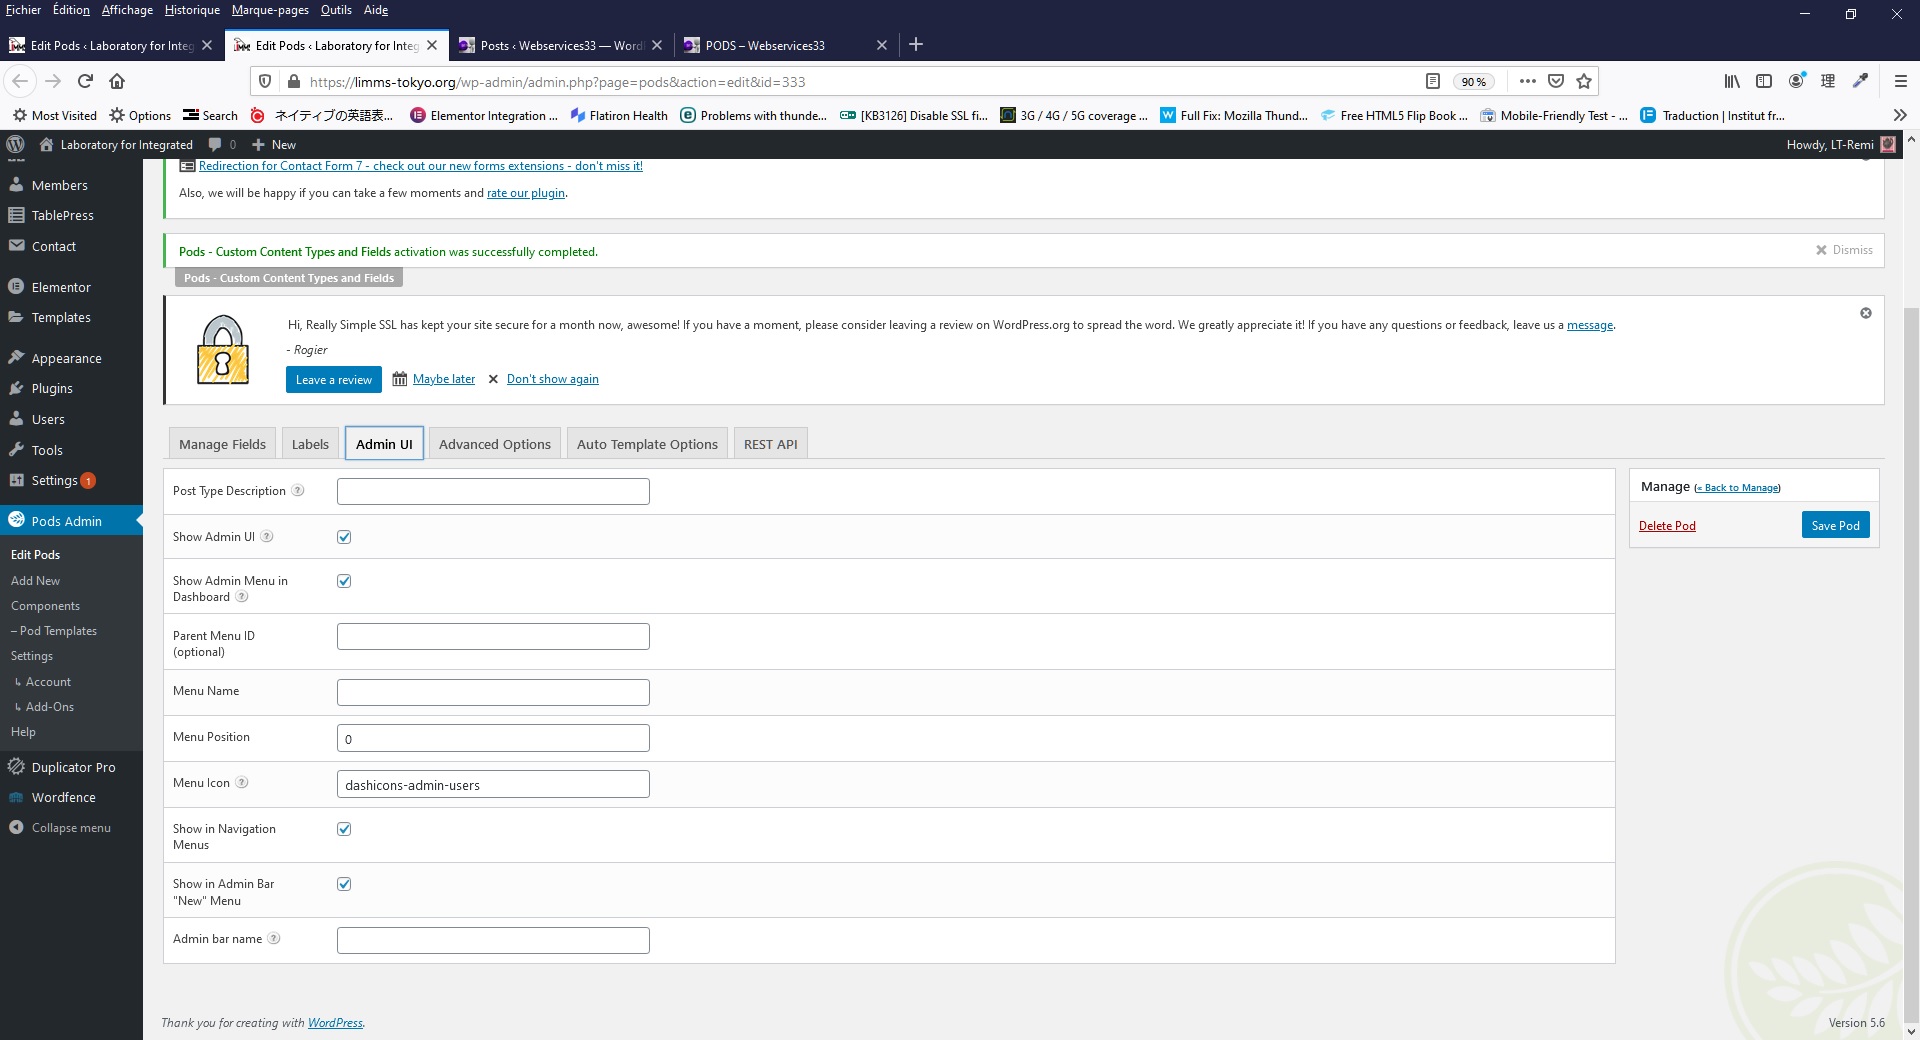
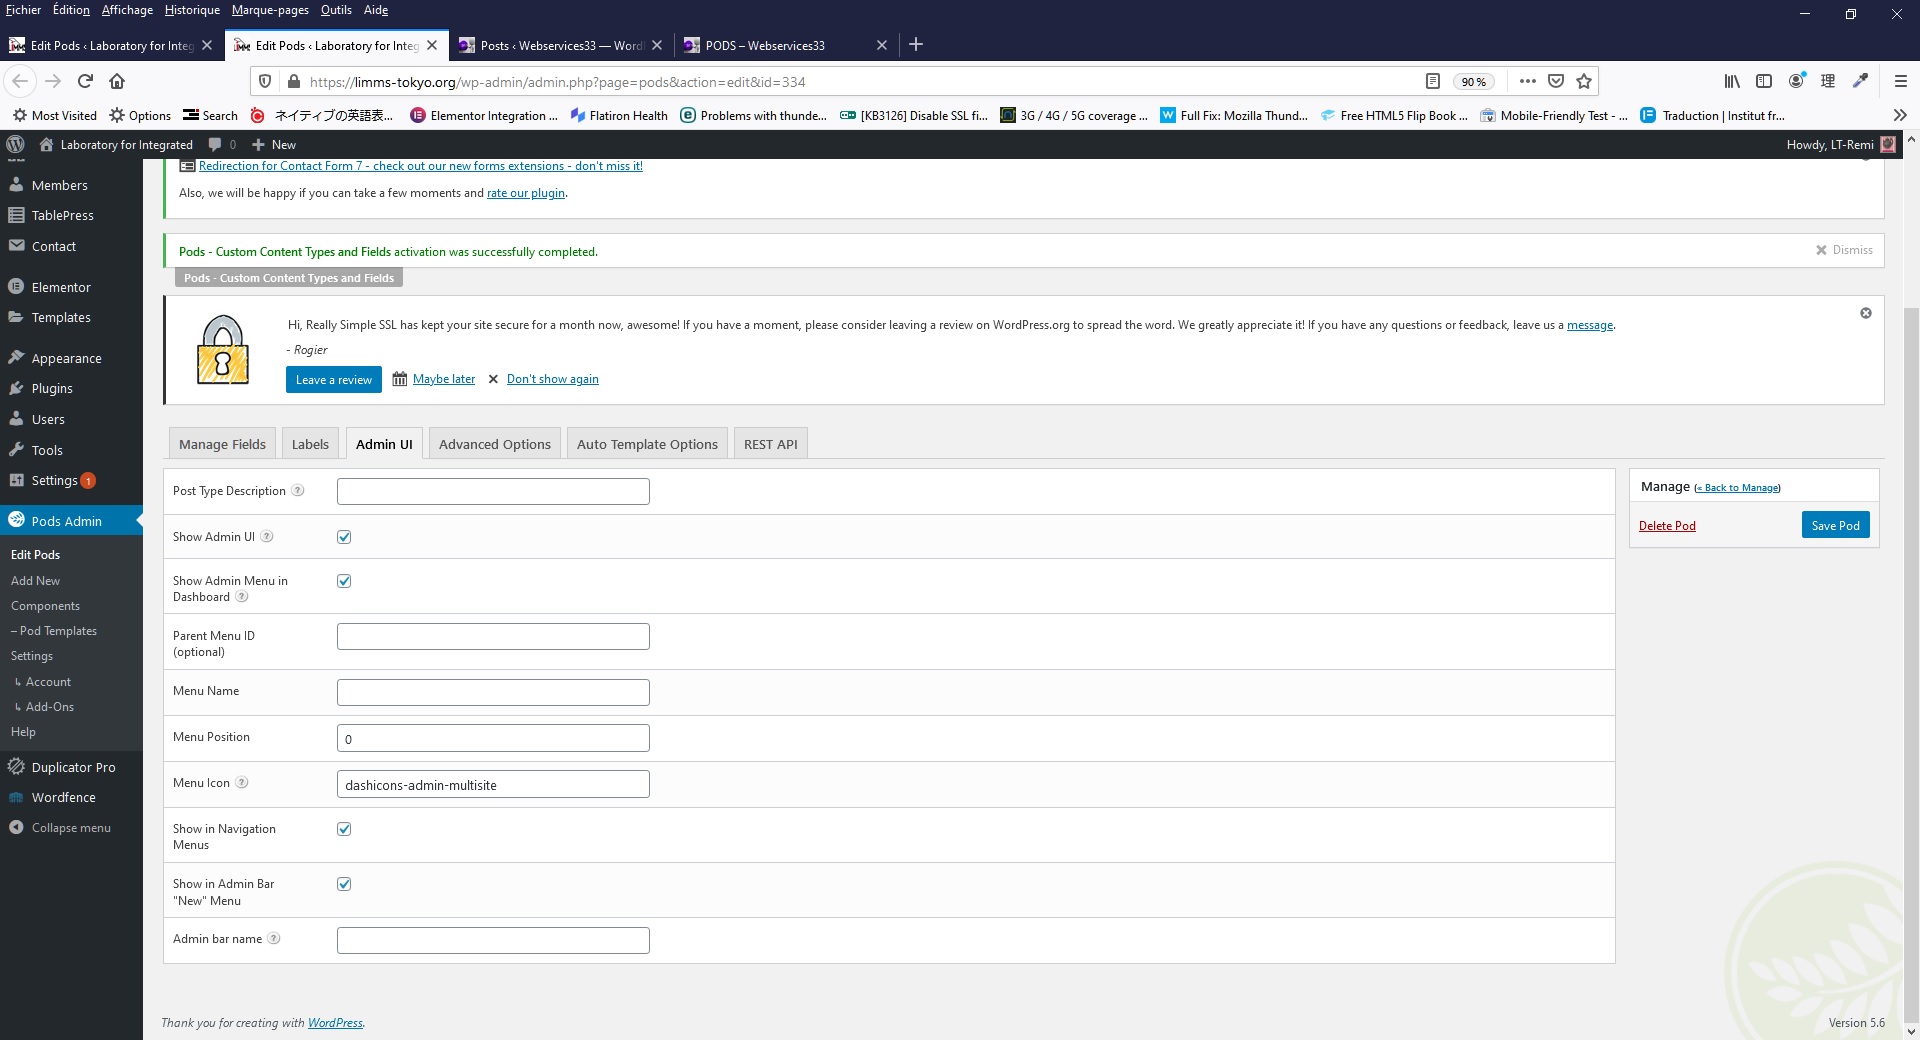
4-Members-Admin-UI
4-Members-Admin-UI
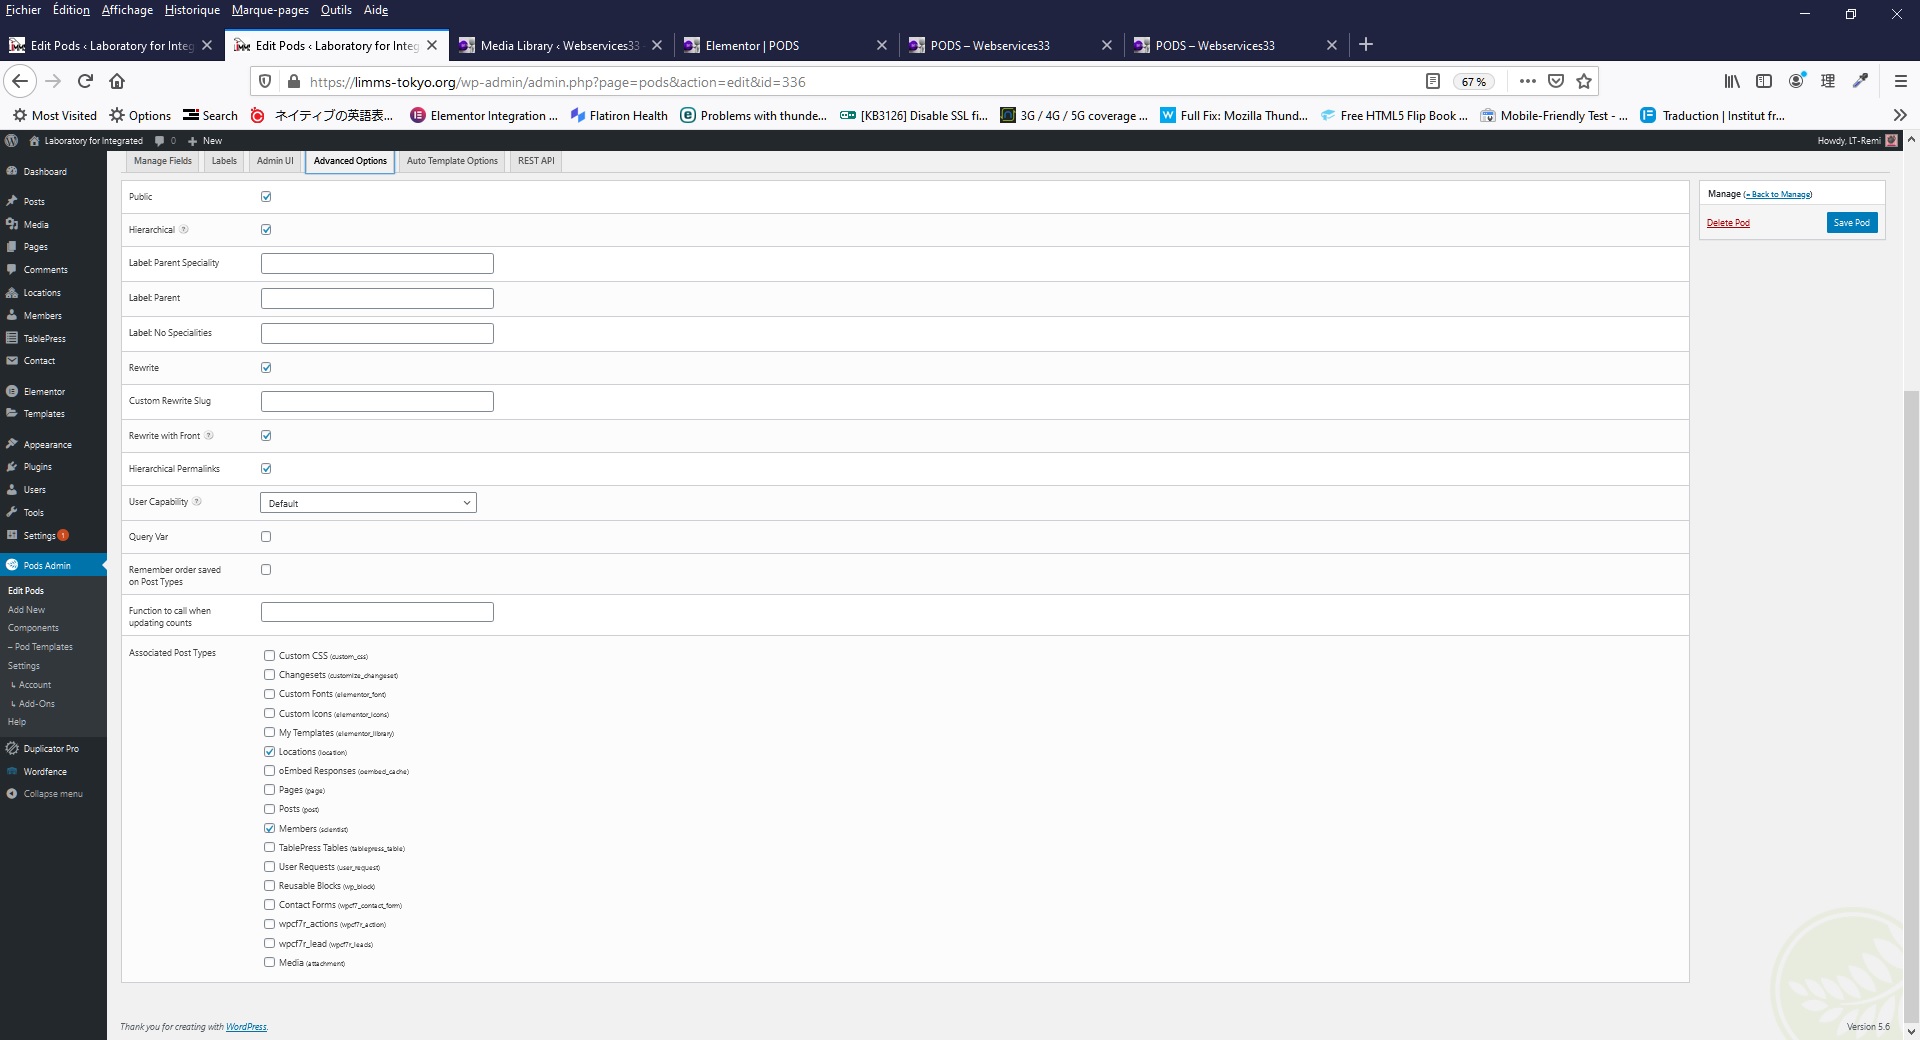
5-Members-Advanced-Options
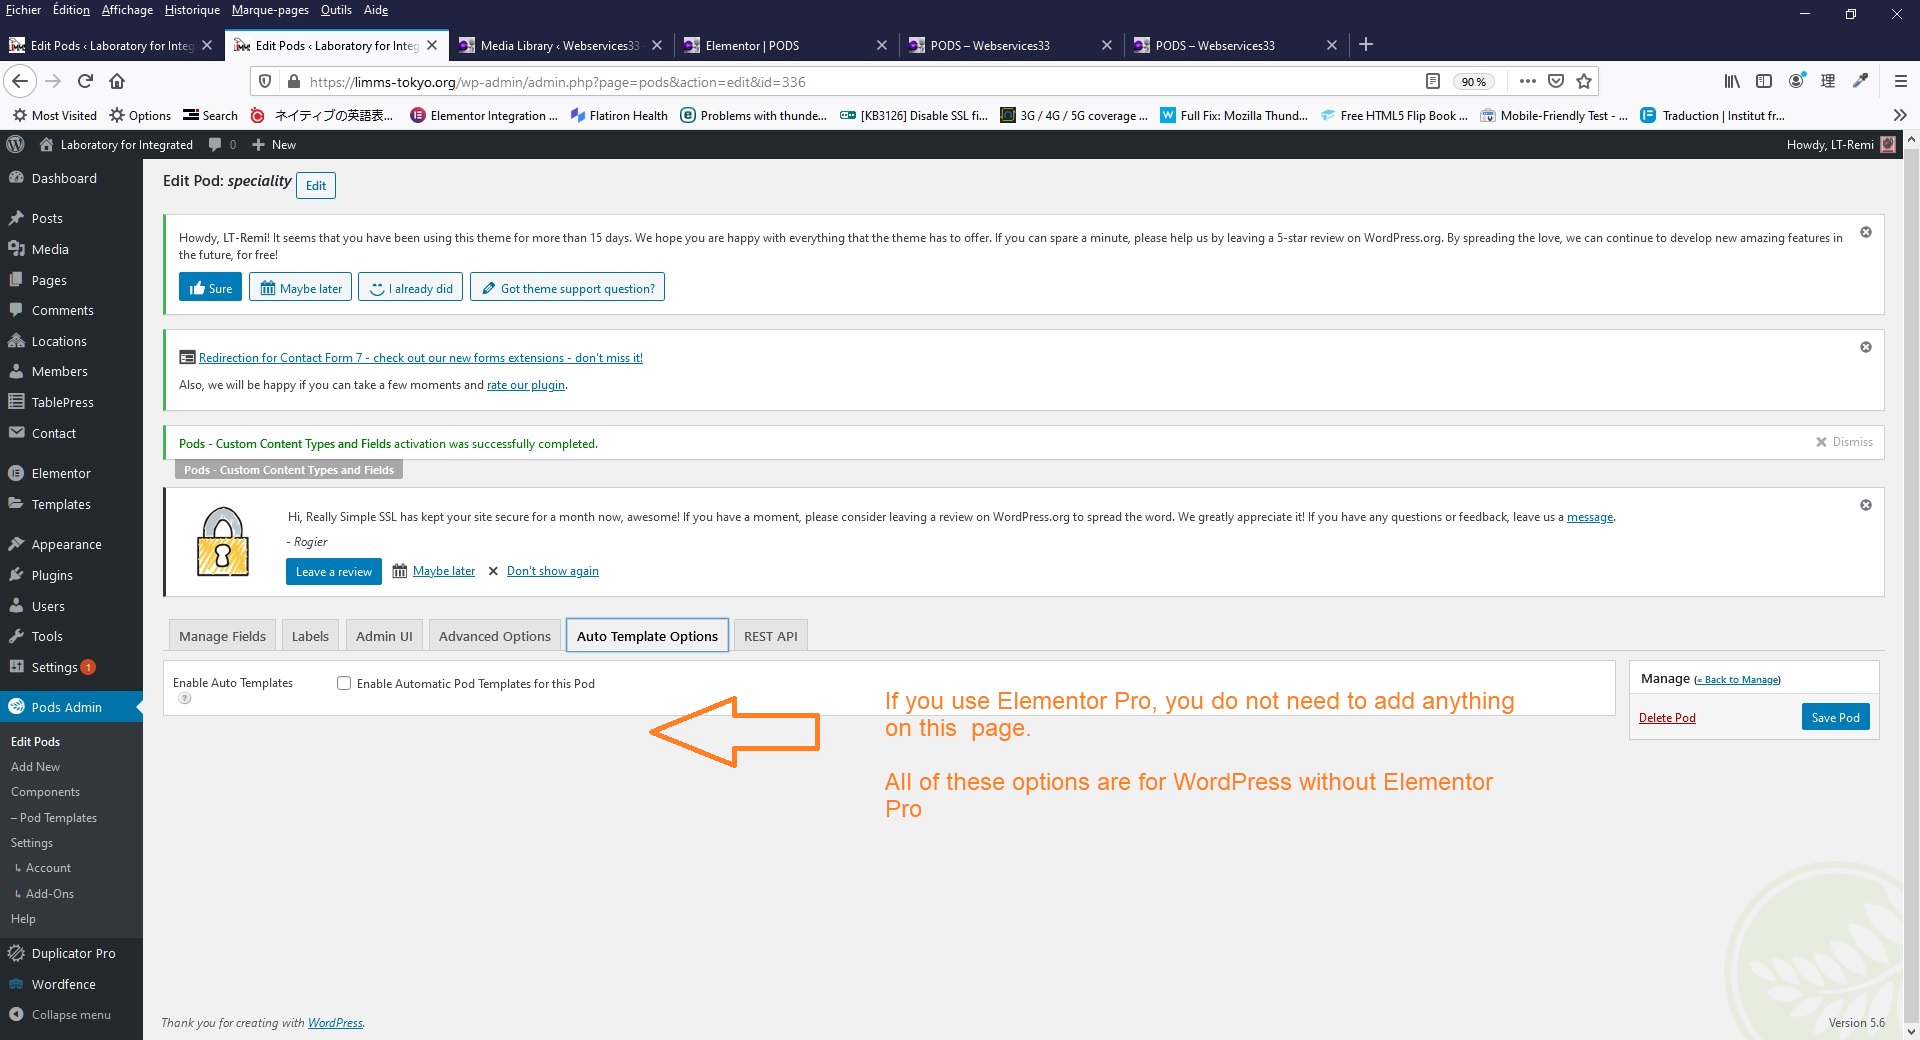
6-Members-Auto-Template-Options

2 – add Locations

Pods Admin ==> add new Create new
Locations ==> Custom Post Type

In the TAB Advanced Field :

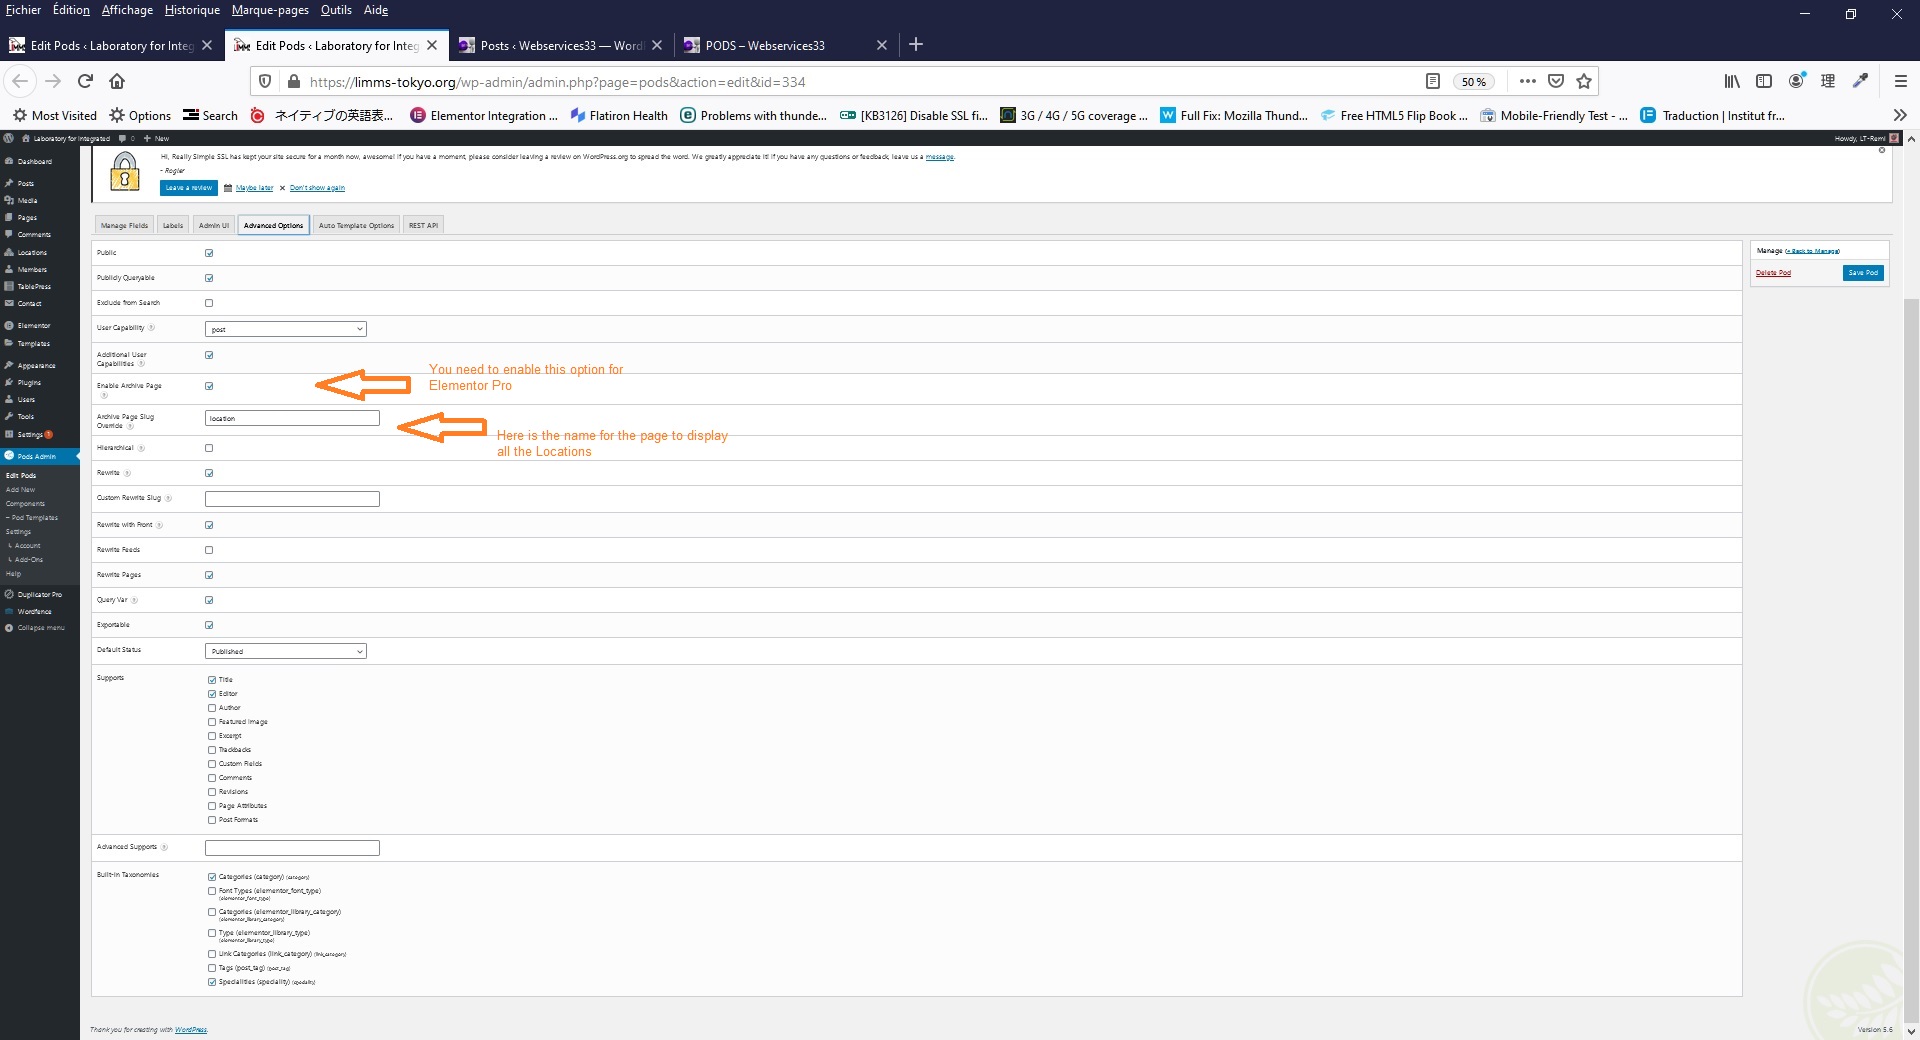
Check [ X] Enable Archive Page. If not checked Pods will not works with Elementor  Pro.

7-Locations-add-Field-Members
8-Locations-Additional-Field-Options
9-Locations-add-Labels
10-Locations-Admin-UI
11-Locations-Advanced-Options
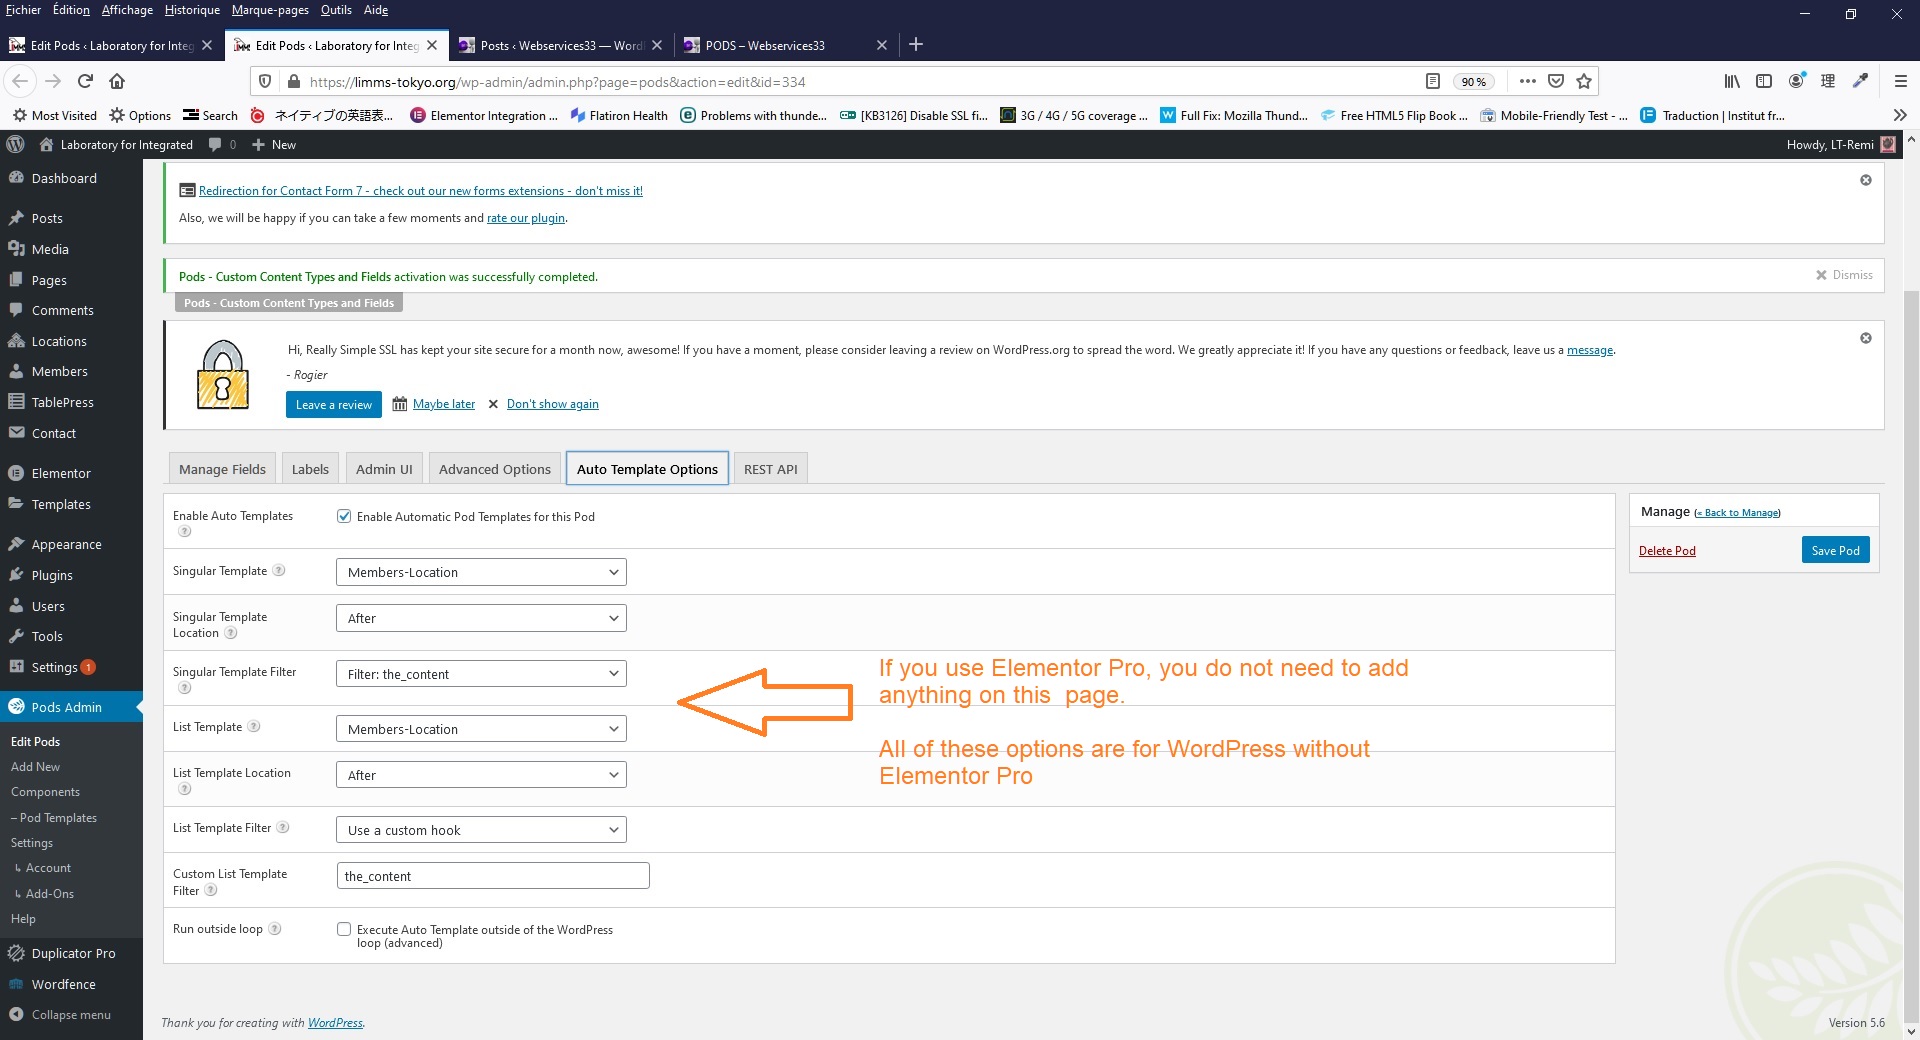
12-Locations-Auto-Template-Options

3- inside Locations

click blue button ==> Add Field

Label ==> Members
Field Type: Relationship
Related to: Members
Bi-Directional Field: Location (locations)


Advanced Tab ==> Selection Type ==> Multi Select
Format ==> Autocomplete
Display Format ==> Item 1, Item 2, Item 3

Allow add new YES
Posts Status Published

Save changes & save Pod

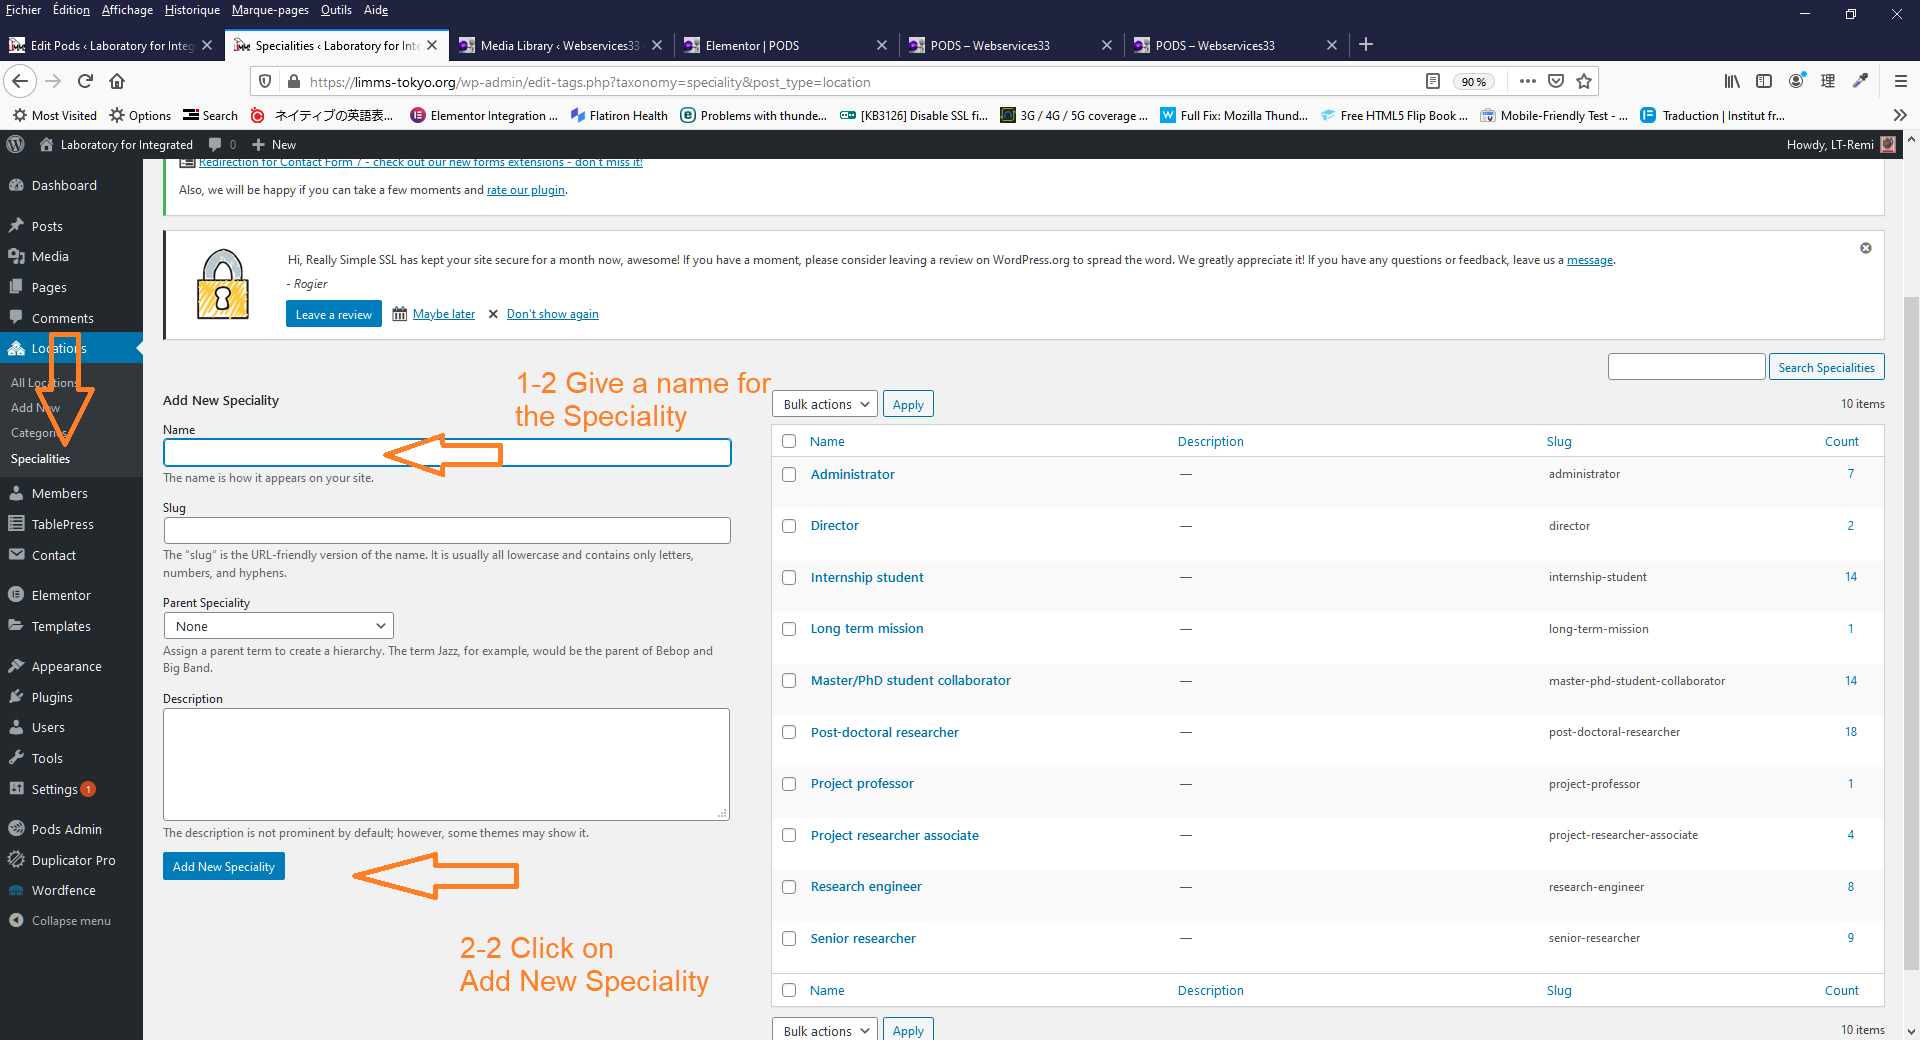
4- Specialities

Create a new Content Type
Content Type: Custom Taximony
Label : Specialities
Click on Next Step

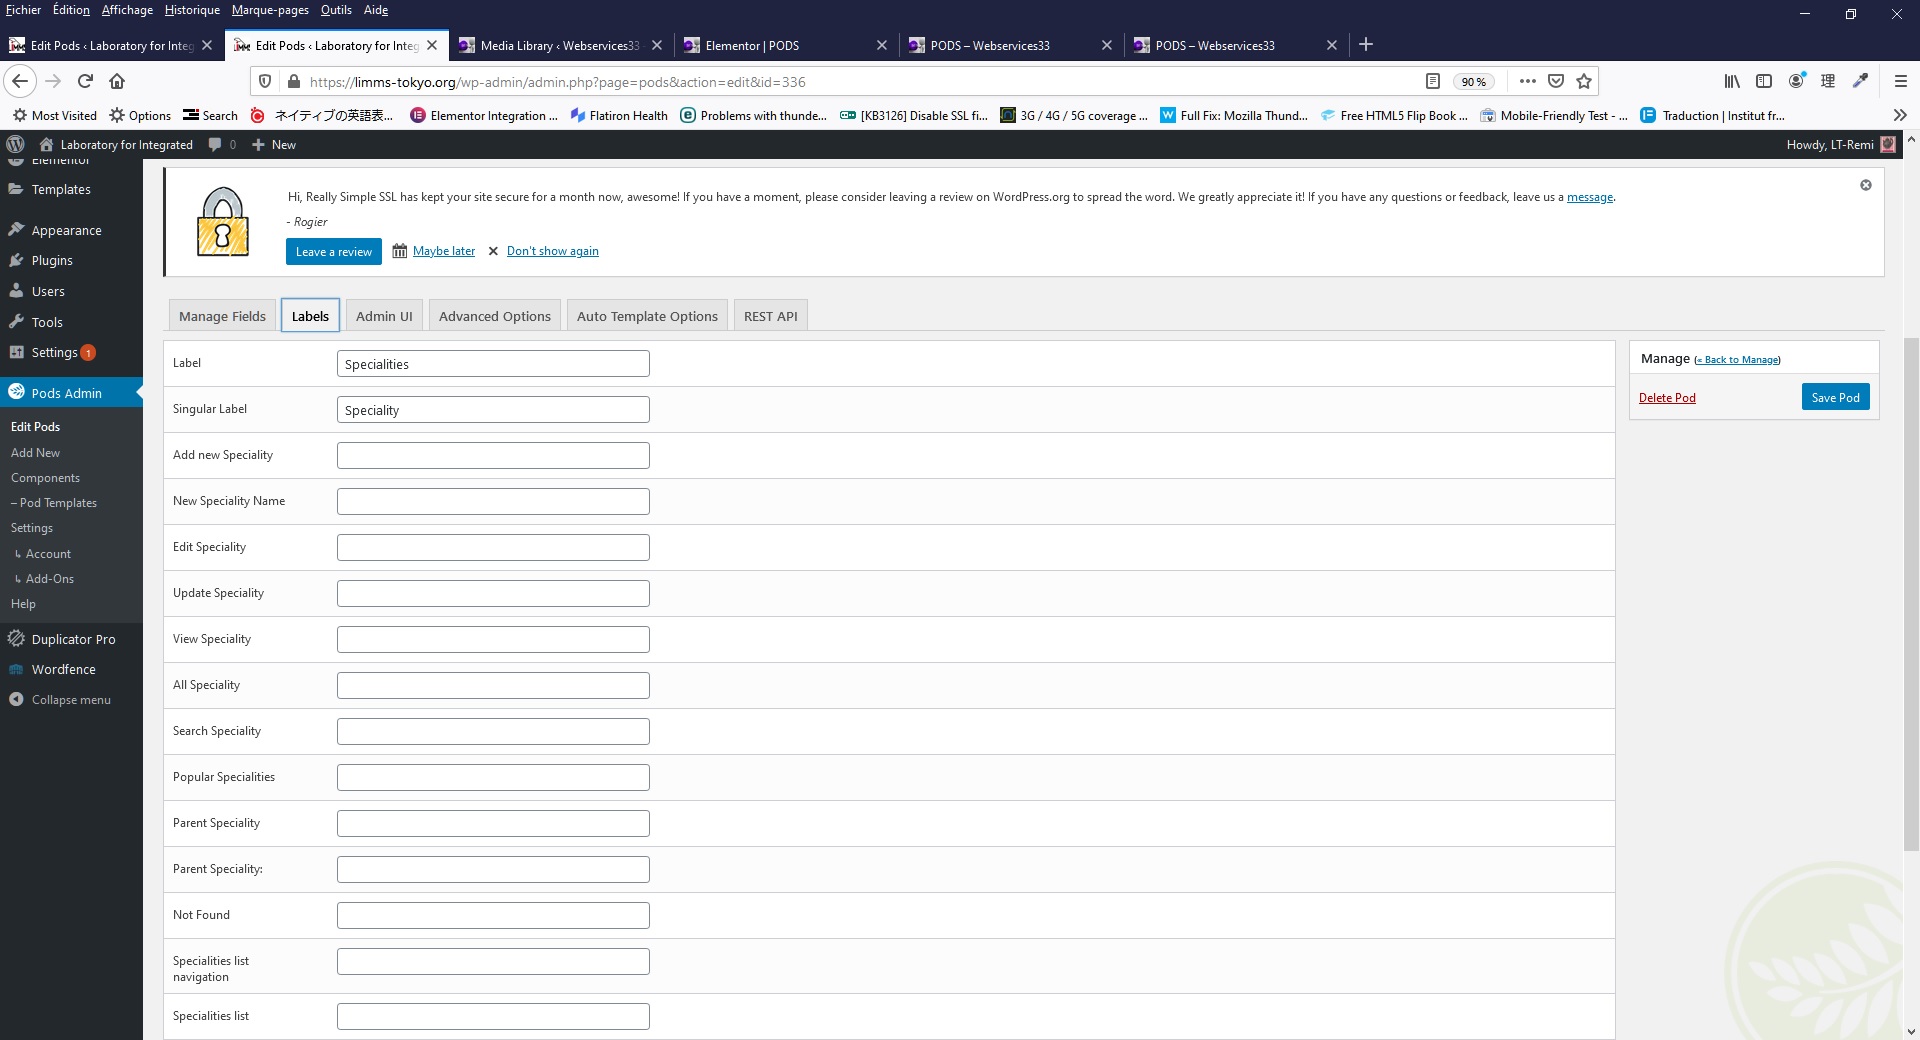
13-Specialities-add-Labels
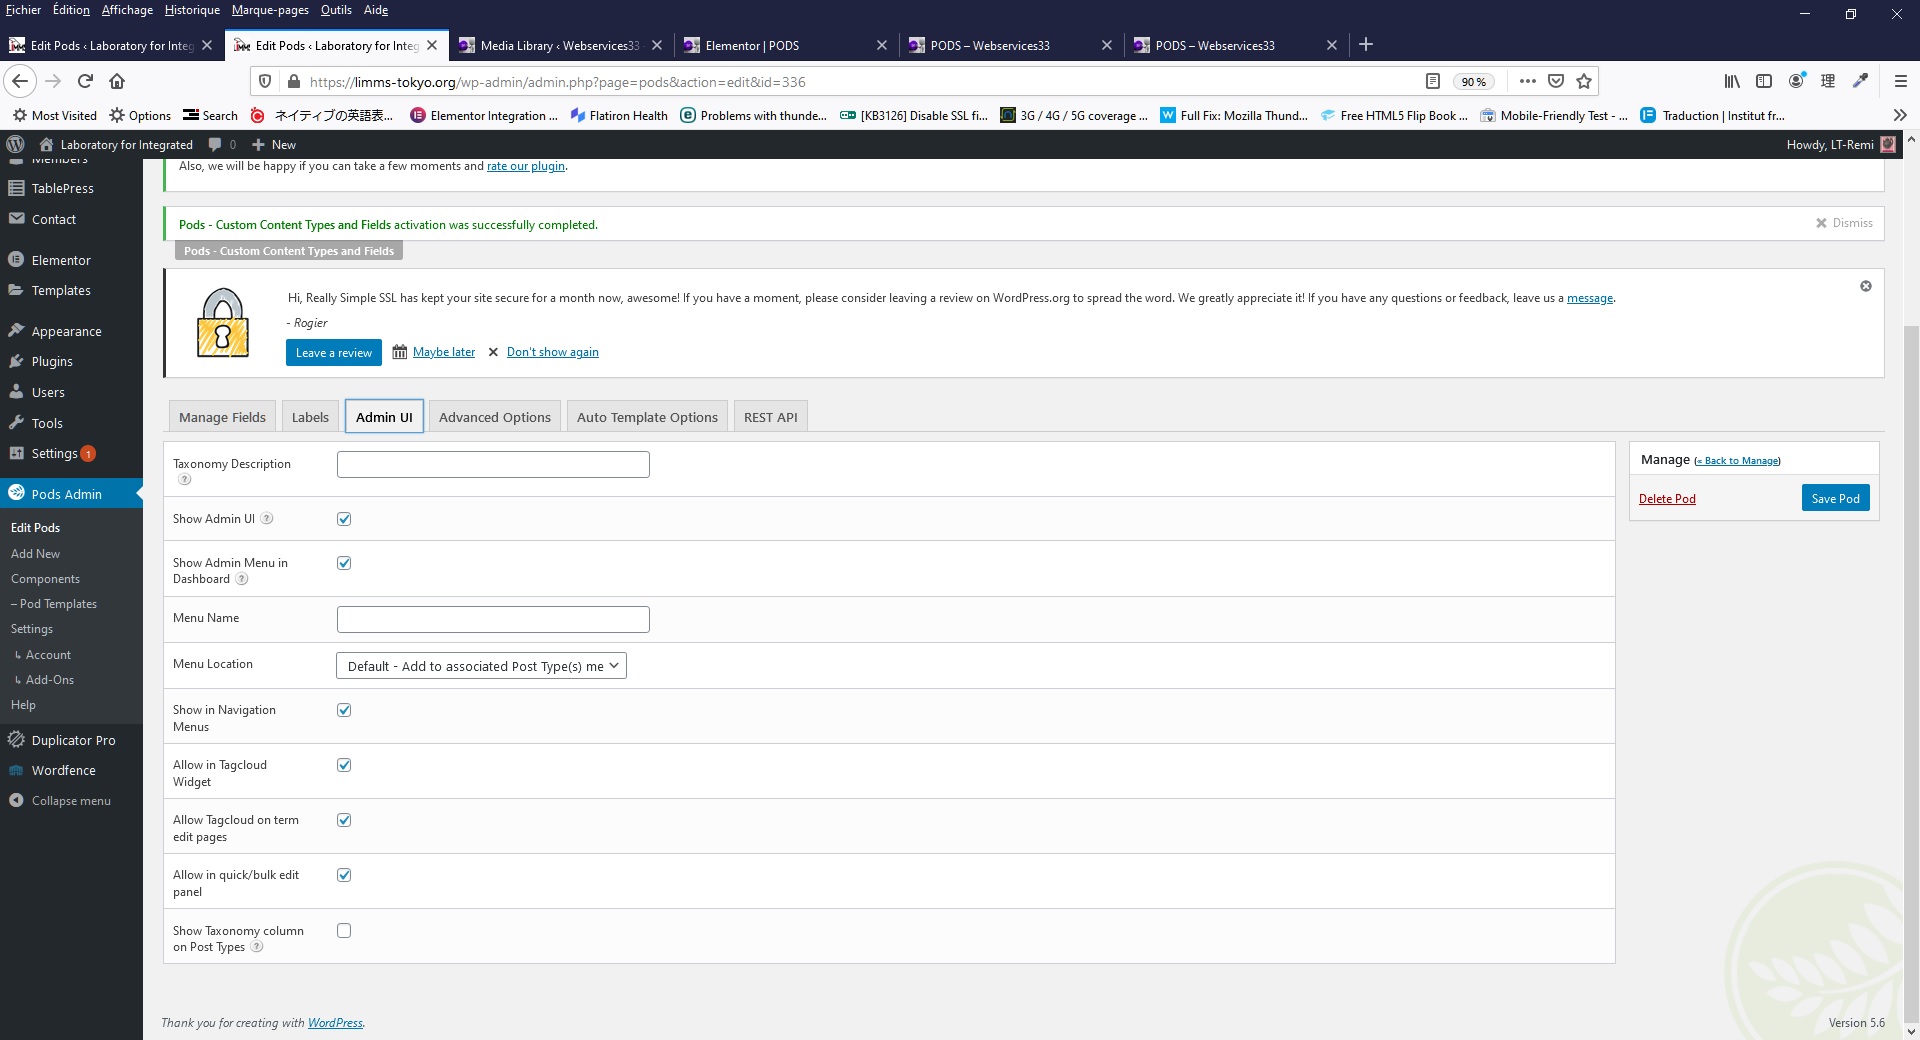
14-Specialities-Admin-UI
15-Specialities-Advanced-Options
16-Specialities-Auto-Template-Options

5- Members

Pods Admin ==> Edit Pods
Select Members ==> Edit ==> Advanced Options ==> Enable Archive Page ( need for Elementor) Select at the end of the page Built-in Taximonies ==> Specialities


Same Page go to the tab Manage Fields ==> Click on Add Field (Blue Button)
Label Location
Field Type : Relationship
Related to Locations
Bi-Directional Field: Members
Option Required OK
Save Field Blue button & Blue button Save Pods

End of Part 1 Pods Admin

Part 2 inside WP Backend

6- Members

Inside WordPress Backend on the left side, you will find a new field named MEMBERS

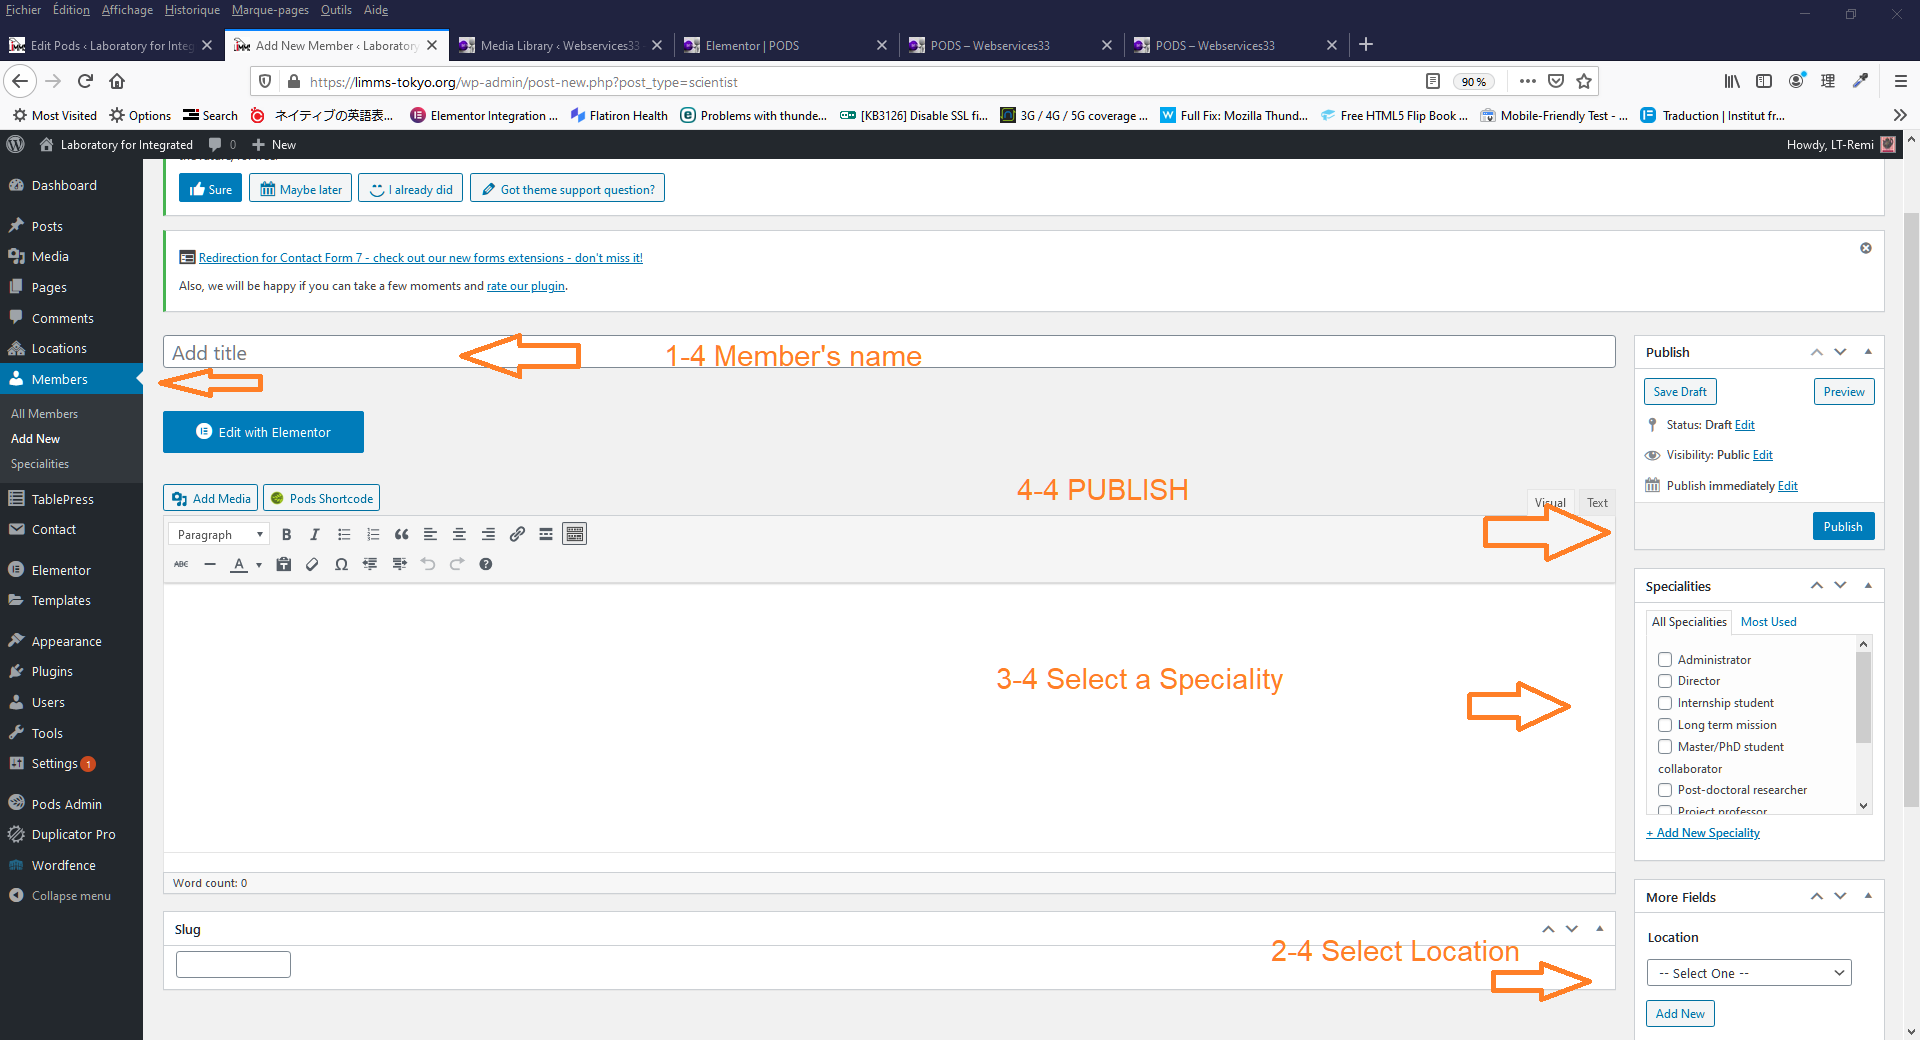
Add new (Member) :Ada Lovelace

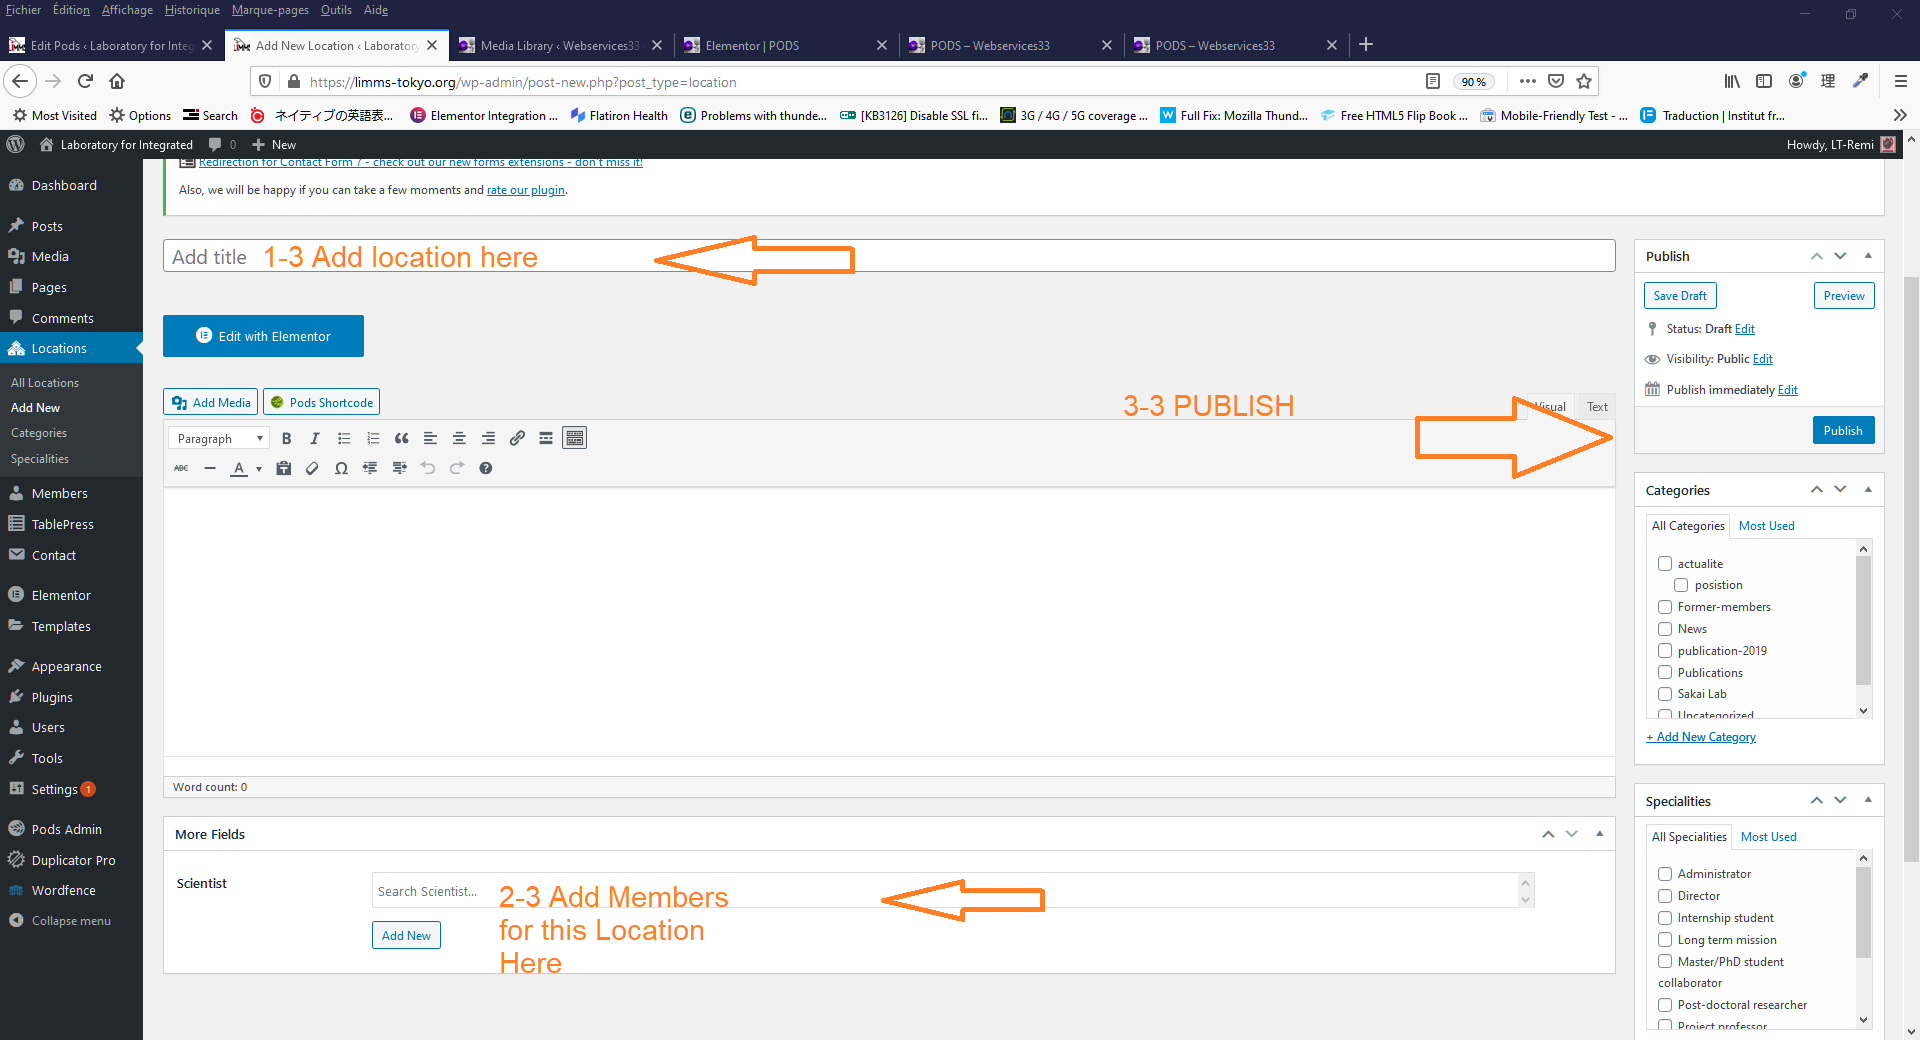
==> Add a new Location ( a new page open ) Name: Tel Aviv University

==> add the new Member Ada Lovelace (publish this page ==>blue button)
In this member’s page add a content (Senior researcher) Tel Aviv University==> Click on Blue button Publish

Go To WP Members Specialities ==> add category ==> Senior researcher
Return to members page to add its speciality after refreshing the page (the category appears on the right side like for Posts)

Inside-WP-add-Members
Inside-WP-add-Locations
Inside-WP-add-Specialities

End of Part 2 inside WP Backend

Part 3 Archives in Elementor Pro

1/3 – ARCHIVES MEMBERS

1-  WP- Elementor ==> Templates ==>  Archive ==> Name of your template (give a name for your template here) ==> (green button)    “Create Template”

e.g. Template name: Members-Archive

Choose a block or a page in the library (to give a design) or click the X to start on a blank page

2- Inside the Elementor page, click on the gear icon at the top bottom left.

Select “Preview Settings”

Preview Dynamic Content as “Members Archive” (choose here the name of the pods archives created)                

Click on APPLY & PREVIEW the links to

3- On the page Drag & drop the widget “Archive Posts“

And now the pods will appears. “YES”

4- Click on the green button “PUBLISH” to save the page.

5- On the new window “Where do you want to display your templates?”

The option ” Entire Site” to display the template across your site DOES NOT EXIST inside the  drop-down list. I choose “Members Archive“. Click on the green button “Save & Close”.

2/3 – ARCHIVES LOCATIONS

1-  WP- Elementor ==> Templates ==>  Archive ==> Name of your template (give a name for your template here) ==> (green button)    “Create Template”

e.g. Template name: Members-Archive

Choose a block or a page in the library (to give a design) or click the X to start on a blank page

2- Inside the Elementor page, click on the gear icon at the top bottom left.

Select “Preview Settings”

Preview Dynamic Content as “Locations Archive” (choose here the name of the pods archives created)                

Click on APPLY & PREVIEW the links to

3- On the page Drag & drop the widget “Archive Posts“

And now the pods will appears. “YES”

4- Click on the green button “PUBLISH” to save the page.

5- On the new window “Where do you want to display your templates?”

The option ” Entire Site” to display the template across your site DOES NOT EXIST inside the  drop-down list. I choose “Locations Archive“. Click on the green button “Save & Close”.

End of Part 3 Archives in Elementor Pro

Part 4 Add Locations & Members in Elementor Pro

MEMBERS

In WordPress Backend go to: Members

Add New (member).

Give a name & Add a photo, like for posts.

Save & Edit the page with Elementor Pro & make the design you want for each member.

Click on the GREEN button when it is finished.

LOCATIONS

In WordPress Backend go to: Locations

Add New (location)
Location Attributes: Elementor Full width UPDATE

Edit with Elementor:

Add DIVIDERS before and after

Add a row insert POSTS
LAYOUT:
Columns: 2 or 3
Posts per Page: 15
Deselect Meta Data: Comments & Date
Change: ReadMore by More Details

QUERY:
Source: Manual Selection
Search and Select: Enter the name of the lab and select the members (hold the shift key to select multiple)
Order by: Title ASC
Then go back to LAYOUT and select the number of columns

End of Part 4 Add Locations & Members in Elementor Pro

Part 5 Display Locations & Members

Display  MEMBERS page & LOCATIONS page on the FrontEnd

The name of the page to display the members [url] is the name chosen in PODS ==> Members ==> Advanced Fields ==> Archive page slug
Here: members-2021


The name of the page to display the locations [url]  is the name chosen in PODS ==> Members ==> Advanced Fields ==> Archive page slug
Here: location


End of Part 5 Display Locations & Members

Part 6 Display Members inside Locations

Display  MEMBERS  dynamicaly inside LOCATIONS page on the FrontEnd

To be able to display the members attached to laboratories, I needed to add a category with the name of LABORATORY inside WordPress MEMBERS.
Then attached each MEMBER to the right LABORATORY.


I open the LABORATORY, from WordPress LABORATORIES and edit the page with Elementor Pro.
I add a new section full width and insert inside POSTS (only available from the Paid version of Elementor Pro).
I choose Layout:
Card
No excerpt
No Meta Data (date, comments)
No Read me More
Badge Taximony Specialities (field created by Pods) (This will display only if you have a photo for this pod)

QUERY:
Source MEMBERS
Include By: Term
Term: [Name of the laboratory]

Click on the Green Button UPDATE & it is done.
Now, I can display dynamicaly the members attached to a laboratory.


End of Part 6 Display Members inside Locations